
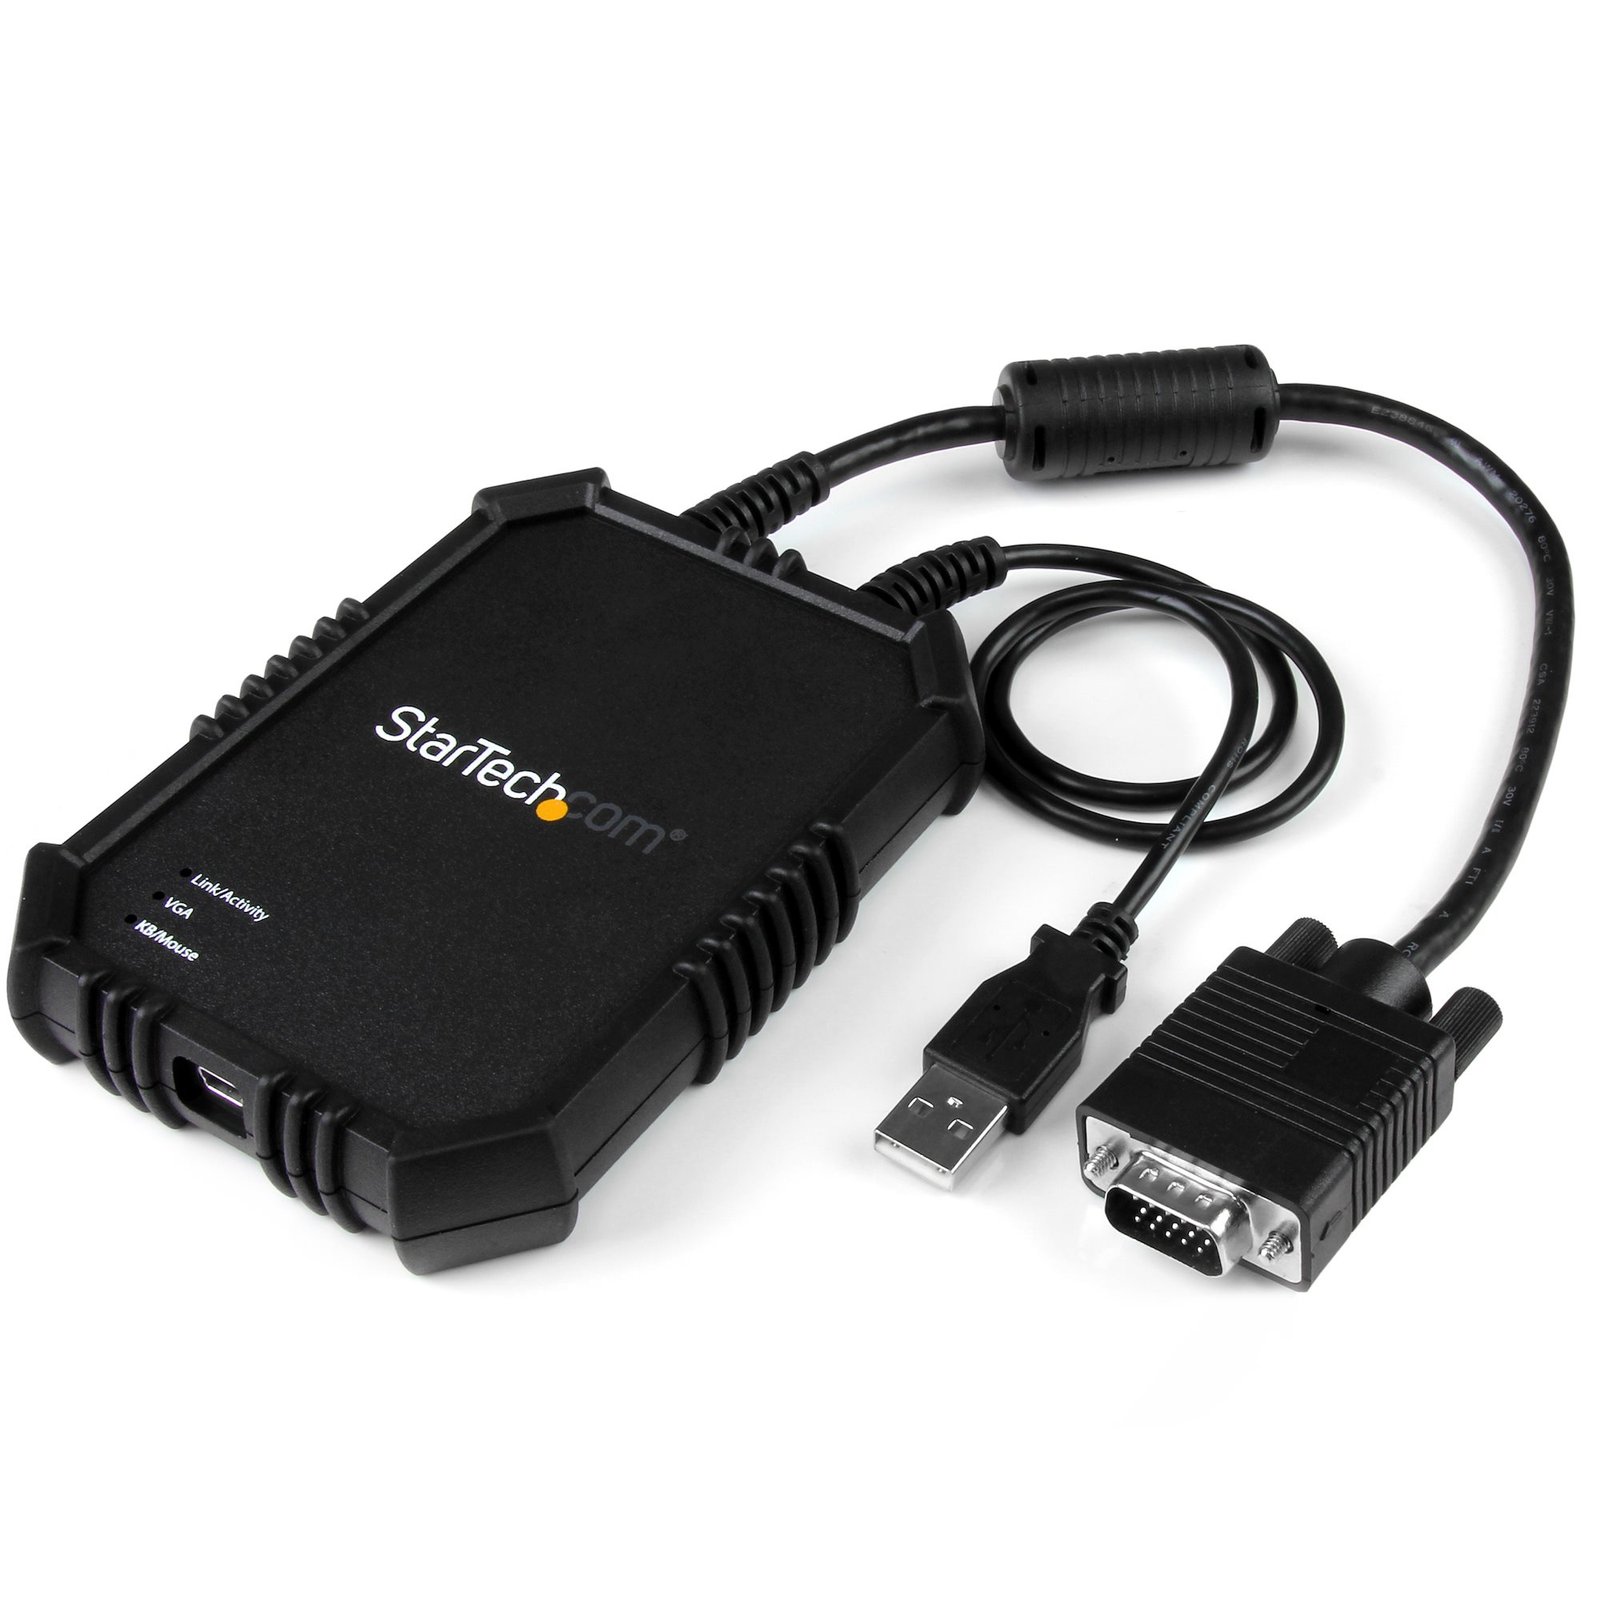
Laptop-to-Server KVM Console with Rugged Housing - TAA
$638.56
Use this USB crash-cart adapter to turn your laptop into a portable KVM console for accessing servers, ATMs and kiosks with file transfer and video capture
Specifications & Compliance
- UPC
- 065030862240
- Brand
- StarTech.com
- Included in Package
- 1 - Rugged crash cart adapter, 1 - USB A to Mini-B cable, 1 - Quick start guide
- Shipping (Package) Weight
- 15.2 oz [430 g]
- Weight of Product
- 8.6 oz [244.0 g]
- Product Length
- 4.9 in [12.5 cm]
- Product Width
- 3.5 in [88.0 mm]
- Product Height
- 0.9 in [22.0 mm]
- Package Depth
- 6.7 in [16.9 cm]
- Package Width
- 11.8 in [30 cm]
- Package Height
- 2.1 in [53 mm]
- Color
- Black
- Cable Length
- 16.4 in [41.6 cm]
- Warranty
- 2 Years
- Connector 1
- USB Mini-B (480Mbps, 2.5W)
- Connector 1 (Quantity)
- 1
- Package Quantity
- 1
- Operating Temperature
- 0°C to 40°C (32°F to 104°F)
- Storage Temperature
- -40°C to 70°C (-40°F to 158°F)
- Humidity
- 80% RH
- Material
- Plastic
- Power Source
- USB-Powered
- Special Notes
- - If you're interfacing with a Linux device, this adapter is only compatible with standard QWERTY keyboards in U.S English configuration, - Note: Mouse function may be limited or non-functional in some BIOS/UEFI environments
- LED Indicators
- 1 - User Console/USB Link, 1 - Host/Server Video (VGA) Link, 1 - Host/Server Keyboard/Mouse USB Link
- Host Connector 1
- VGA
- Host Connector 1 (Quantity)
- 1
- Audio
- No
- Host Connector 2
- USB-A (480Mbps, 2.5W)
- Host Connector 2 (Quantity)
- 1
- Maximum Analog Resolutions
- 1920x1200 @ 60Hz
- Cascadable
- No
- Rack-Mountable
- No
- Number of KVM Ports
- 1
- IP Control
- No
- Supported Platforms
- USB
- PC Video Type
- VGA
- Number of Monitors Supported
- 1
- On-Screen Display
- No
- Cables Included
- Yes
- Hot-Key Selection
- No
- Maximum Number of Users
- 1
- CAC Support
- No
- Product Depth
- 4.5 in [11.5 cm]
Questions & Answers
Why did the software not install properly in macOS High Sierra (10.13) or later?
Starting in High Sierra 10.13, macOS enforces stricter security policies than previous revisions. As a result of these changes, software packages, like those used in this installation, will need to be allowed within the macOS Security and Privacy settings, immediately after the software has been installed, in order for the device to operate. To allow the software, follow these steps after you've completed installation on your Mac: Open System Preferences . Open Security & Privacy . Click the Allow button near the bottom of the General tab. Note: The option to allow the software will be available within the Security & Privacy settings for 30 minutes. If the software is not allowed within that time frame, the software must be reinstalled in order for macOS to grant the opportunity to allow it again.
How do I install my laptop crash cart in Windows 7, Windows 8, Windows 10, or Windows 11? (.exe method)
To use the laptop crash cart, install the Crash Cart software on the client computer before connecting the hardware. After the software is installed, connect the crash cart adapter between the client and host computers to begin controlling the host system. Explanation: The USB Crash Cart software must be installed on the client computer before the crash cart adapter is connected. Hardware Requirements Before you begin, ensure you have: A host computer with VGA and USB ports (the computer to be controlled) A client computer running Windows with an available USB port (the computer used to control the host) The StarTech.com laptop crash cart adapter A VGA cable, USB cable, and Mini-USB cable Install the Software Before installing, ensure that Windows is fully updated with the latest security updates and feature updates available for your operating system. To install the software: Download the latest software package from the StarTech.com Drivers & Downloads page. Extract the contents of the downloaded ZIP file. Open the extracted Windows folder. Right-click Setup.exe and select Run as administrator . Follow the on-screen instructions to install the Crash Cart software. Note: If Run as administrator is unavailable, ensure that you are launching Setup.exe from the extracted folder rather than directly from within the ZIP file. Connect the Hardware After the software installation is complete: Connect the VGA and USB cables from the crash cart adapter to the host computer. Connect the Mini-USB cable between the crash cart adapter and the client computer. Launch the USB Crash Cart application on the client computer. The software automatically detects the connected host computer and displays its video output. When you move the mouse pointer into the Crash Cart window, keyboard and mouse control is redirected from the client computer to the host computer.
How do I install the Laptop Crash Cart Adapter software on macOS using the .dmg file?
Yes, the Laptop Crash Cart Adapter software must be installed before you can use the KVM console adapter to view a connected computer. Download and install the latest software from the StarTech.com Support website. Explanation : To install the Laptop Crash Cart Adapter software on macOS using the .dmg file: Download the latest software from the StarTech.com Support website at http://www.startech.com/Support . Use the product part number or product ID shown on the product packaging to locate the correct software. Locate the downloaded files. Mac OS X typically saves downloaded files in the Downloads folder associated with your user account. Double-click Software Pack.zip . Double-click the Mac folder. Double-click Install.dmg . Double-click USB Crash Cart Adapter . After installation, the USB Crash Cart Adapter program is located on the desktop and is ready to run.
My Monitors are flickering when connected through the KVM Switch. What do I do?
Monitors may begin flickering when they receive a signal of insufficient quality. There are a few potential fixes available that will help to improve the signal quality in order to eliminate flickering: Replace Video Cables with high-quality Video Cables (e.g. upgrade DisplayPort 1.2 Cables to DisplayPort 1.4 Cables ). Use shorter Video Cables to reduce signal attenuation. When possible, remove Video Adapters to use native Video Connection Types (e.g. go from VGA to VGA , or DisplayPort to DisplayPort ) For DisplayPort Monitors , try changing the DisplayPort Version on the Monitor . For information on how to change your Monitor Settings refer to the Manual from the Monitor Manufacturer . Update the Drivers for the Computer’s GPU to the latest available from the Monitor Manufacturer .
Everything is hooked up but nothing is working. What should I do?
When you troubleshoot issues with a USB crash cart adapter, there are some quick tests that you can complete to rule out potential problems. You can test to make sure that the following components are working correctly and are not the source of the issue: Video cables Video source Computer system USB crash cart adapter To test your setup components, try the following: Use the video cables, video source, computer, and USB crash cart adapter in another setup to see if the problem is with the components or the setup. Use a different video cable, video source, computer, and USB crash cart adapter in your setup to see if the problem persists. Ideally, you should test a component that you know works in another setup. When you test your cables, it is recommended that you do the following: Test each cable individually. Use short cables. When you test the video cables, video source, and the USB crash cart adapter, it is recommended that you do the following: Press the Windows key + R, type devmgmt.msc, and press Enter to open Device Manager. If the device is listed with an error, follow the instructions on the website to reinstall the drivers. In order for the adapter to work correctly, the software must be installed on your operating system. After the software is installed on your operating system, run the software. The software automatically detects the video source when it is present on the video port.
How do I use this USB crash cart adapter to record video?
You can use the USB crash cart adapter software to capture video. Videos taken on the attached host computer are saved on the client computer that's running the USB crash cart software. Note: When you record videos, the file transfer feature is temporarily blocked. To record videos, complete the following: In the USB crash card adapter software, click the record button. Specify the location where you want to save the files. Specify how long you want to record for in seconds.
What do I do if the keyboard or mouse control is not working?
If the video works on your client computer but the keyboard or mouse is not working with your laptop crash cart adapter, try the following: Make sure that the USB cable on the laptop crash cart adapter is firmly connected to the host computer. If you're using multiple monitors with the host computer, make sure that the VGA cable connected to the laptop crash cart adapter is connected to the primary monitor. Under Keyboard , change the Active emulation type to PS/2 .
How do I confirm that Windows detects my USB device?
To confirm that Windows detects your USB device, complete the following: Press the Windows key+ R , type devmgmt.msc , and press Enter . In Device Manager , under the appropriate heading, confirm that your expansion card is listed and that there isn't an exclamation mark next to it. For example, a USB controller card would be under Universal Serial Bus controllers . Your USB device is listed according to the name of the chipset. To determine the name of the chipset of your USB device, navigate to www.StarTech.com and look on the Technical Specifications tab for your product.
How can I check if my USB device is properly detected by Mac OS?
To confirm that the Mac OS detects your USB device, complete the following: Click the Apple icon. Click About This Mac . Click More Info or System Report . Under the appropriate heading, confirm that your USB device is listed and that there isn't an error. For example, a network card would be under Ethernet Cards . You may need to refresh the System Information page after you plug in your device. To do so, press Command + R with the System Information page open. Your USB device is listed according to the name of the chipset. To determine the name of the chipset of your USB device, navigate to www.StarTech.com and look on the Technical Specifications tab for your product.
How are the NOTECONS01, NOTECONS02, and NOTECONS02X meant to be used?
The StarTech.com NOTECONS01, NOTECONS02, and NOTECONS02X devices are designed for temporary access to headless servers and are not optimized for long-term use, high-performance graphical workloads, high-resolution displays, or multi-monitor configurations. For best performance, StarTech.com recommends using a single display at resolutions up to 1080p. Explanation: The StarTech.com NOTECONS01, NOTECONS02, and NOTECONS02X devices are intended for short-term console access and troubleshooting in headless server environments. These devices are designed to provide immediate server access when direct keyboard, video, and mouse connectivity is required. The NOTECONS01, NOTECONS02, and NOTECONS02X devices are not optimized for: Continuous daily operation or long-term workstation use High-performance graphics or video-intensive workloads High-resolution display environments above 1080p Multi-monitor display configurations For optimal compatibility, stability, and performance, StarTech.com recommends using these devices with a single display at resolutions up to 1080p.
Related products
-
2-Port DisplayPort KVM Switch, 4K 60Hz, DP 1.2, EDID Management, 2-Port USB 3.0 Hub, 4x USB HID Ports, TAA Compliant
$435.61 Add to cart -
4-Port Dual-Monitor DisplayPort KVM Switch, 4K 60Hz, 2x USB 5Gbps Hub Ports, 2x USB 2.0 HID Ports, Hotkey and Push-Button Switching, TAA Compliant - 3.5mm Audio, HDCP
$849.71 Add to cart -

Portable Laptop Crash Cart Adapter, USB/VGA/Mini DisplayPort KVM Console, File Transfer and Video Capture, TAA Compliant
$525.99 Add to cart -
2-Port USB-C Cable KVM Switch, 4K 60Hz DisplayPort Output, Compact KVM with 4ft/1.2m USB Type-C/Audio Integrated Cables, Bus Powered - Remote Push-Button/Hotkey Switching
$126.99 Add to cart