
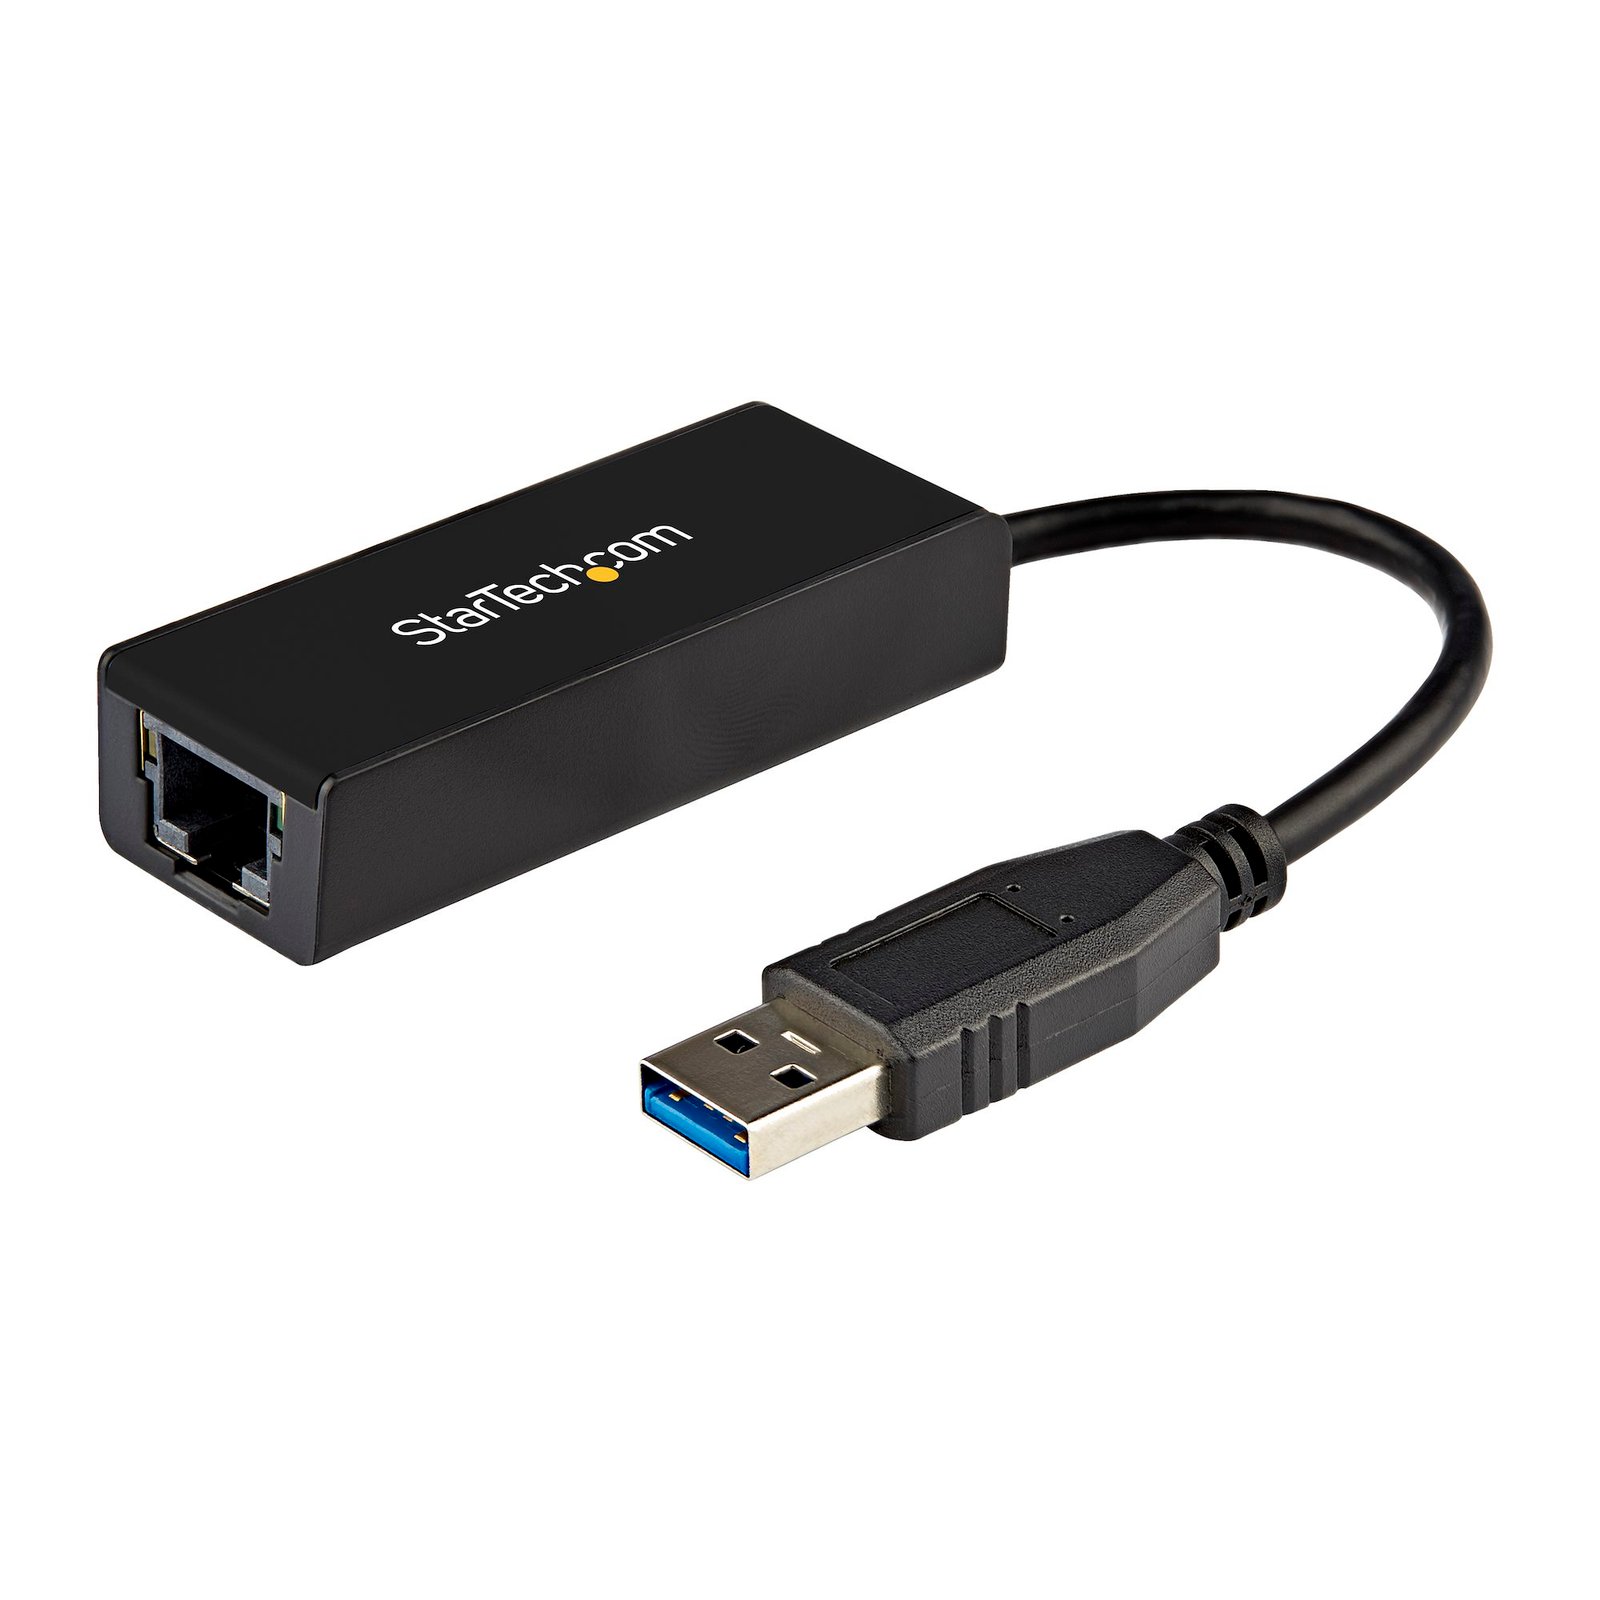
USB 3.0 to Gigabit Ethernet Network Adapter, 10/100/1000 Mbps, USB to RJ45, USB 3.0 to LAN Adapter, USB 3.0 Ethernet Adapter (GbE), TAA Compliant
$35.86
Add Gigabit Ethernet network connectivity to a Laptop or Desktop through a USB 3.0 port
Specifications & Compliance
- UPC
- 065030848404
- Brand
- StarTech.com
- Included in Package
- 1 - USB 3.0 Gigabit Adapter, 1 - Instruction Manual
- Shipping (Package) Weight
- 1.4 oz [40 g]
- Weight of Product
- 1.0 oz [28.0 g]
- Product Length
- 8.5 in [21.5 cm]
- Product Width
- 1.0 in [26.0 mm]
- Product Height
- 0.6 in [15.5 mm]
- Package Depth
- 5.0 in [12.6 cm]
- Package Width
- 6.9 in [17.6 cm]
- Package Height
- 0.7 in [18 mm]
- Color
- Black
- Cable Length
- 5.3 in [13.5 cm]
- Warranty
- 2 Years
- Connector 1
- USB-A (5Gbps, 4.5W)
- Connector 1 (Quantity)
- 1
- Package Quantity
- 1
- Connector 2
- RJ-45
- Connector 2 (Quantity)
- 1
- Operating Temperature
- 0°C to 40°C (32°F to 104°F)
- Storage Temperature
- -20°C to 60°C (-4°F to 140°F)
- Humidity
- < 80% RH
- Material
- Plastic
- Industry Standards
- IEEE802.3i, IEEE 802.3u, IEEE 802.3ab, IEEE 802.3az, IEEE 802.1q VLAN tagging
- Power Source
- USB-Powered
- Chipset ID
- ASIX - AX88179A
- Special Notes
- Jumbo Frames are no longer supported in macOS
- Input Voltage
- 5V DC
- Output Voltage
- 5 DC
- LED Indicators
- 1 - Link (Amber), 1 - Activity (Green)
- Number of Ports
- 1
- Interface
- RJ45 (Gigabit Ethernet)
- Bus Type
- USB 3.2 Gen 1 (5Gbps)
- Type and Rate
- USB 3.0 (5Gbps)
- System and Cable Requirements
- Available USB port
- Compatible Networks
- 10/100/1000 Mbps
- Auto MDIX
- Yes
- Full Duplex Support
- Yes
- Max Distance
- 100m [328ft]
- Jumbo Frame Support
- 4K max.
- Wake-On-LAN (WOL)
- Yes
- Network Adapter Form Factor
- Attached Cable
Questions & Answers
How do I install my network card in Windows Vista, Windows 7, Windows 8, Windows 10, or Windows 11? (.exe method)
To install a network card driver in Windows, download the latest driver package from StarTech.com, extract the files, run Setup.exe as an administrator, and restart the computer if prompted. Explanation: Before installing the network card driver, ensure that Windows is fully updated with the latest service packs, security updates, and feature updates available for your operating system. To install the driver: Download the latest driver package from the StarTech.com Drivers & Downloads page. Locate the downloaded ZIP file and extract its contents. Open the folder that matches your version of Windows, if applicable. Right-click Setup.exe and select Run as administrator . Follow the on-screen instructions to complete the installation. Restart the computer if prompted. After Windows restarts, the operating system will complete the driver installation and the network card should be ready to use. Note: If the Run as administrator option is unavailable, ensure that you are launching Setup.exe from the extracted folder and not directly from within the ZIP file.
How do I install my network card in Windows XP? (.exe method)
Prior to installing this device, ensure that your operating system is up to date (for example, you have installed the most recent service pack). To install the driver: Download the latest drivers from the StarTech.com website ( http://www.startech.com/Support ). You can find the part number and product ID on the product’s packaging. Note: Windows will typically save the files to the Downloads folder that is associated with your user account (for example, C:Documents and Settings your_name My DocumentsDownloads). Once the download is complete, right-click the zip folder that you downloaded, select Extract All , and follow the on-screen instructions. Select the appropriate folder for your operating system. Double-click Setup.exe. Follow the on-screen prompts to install the device drivers and restart the computer when prompted. Your computer will automatically complete the driver installation and your device should be ready to use.
Is there an alternative method to install my network card driver in Windows Vista, Windows 7, Windows 8, Windows 10, or Windows 11?
Yes. If the standard Setup.exe installation method does not work, you can manually install the network card driver through Device Manager by selecting the driver files directly. Explanation: Before installing the network card driver, ensure that Windows is fully updated with the latest service packs, security updates, and feature updates available for your operating system. To manually install the driver: Download the latest driver package from the StarTech.com Drivers & Downloads page. Extract the contents of the downloaded ZIP file. Open Device Manager by pressing Windows Key + R, typing devmgmt.msc, and pressing Enter. Locate the network adapter with a driver issue, typically identified by a yellow exclamation mark (!) or question mark (?). Right-click the device and select Update Driver. Select Browse my computer for drivers. Select Let me pick from a list of available drivers on my computer. If prompted, select Show All Devices and click Next. Click Have Disk. Browse to the extracted driver folder and locate the appropriate Manual Drivers directory for your operating system and system type (32-bit or 64-bit). Select the driver information file (.INF) and click Open. Click OK, then Next to begin the installation. Follow the on-screen prompts to complete the driver installation. After installation is complete, the network card should appear normally in Device Manager and be ready for use. Note: The device name displayed in Device Manager may vary depending on the network controller used by the product.
Is there a different or more advanced way to install my network card in Windows XP?
Before you install the device, make sure that your operating system is current (for example, the most recent service pack is installed). Download the latest drivers from the StarTech.com website at http://www.startech.com/Support . The part number and product ID are on the product packaging. Note: Windows usually saves the files to the Downloads folder that is associated with your user account (for example, C:Documents and Settings your_name My DocumentsDownloads). After the download is complete, right-click the zip folder that you downloaded, click Extract All , and complete the instructions. Press the Windows key + R , type devmgmt.msc , and press Enter to open the Device Manager. Right-click AX88179 , which will have “!” or “?” next to it to indicate a driver issue. Click Update Driver . On the Hardware Update Wizard screen, click Install from a list or specific location (Advanced) , and then click Next . Select the Don’t search, I will choose the driver to install option, and then click Next . On the Hardware Type screen, click Show All Devices , and then click Next . Note: The Hardware Type screen does not appear on all systems. If you do not see this screen, skip this step. On the Select the Device Driver you want to install for this hardware screen, select the Have Disk option. In the Install from Disk dialog box, click Browse . Browse to the AX88179 your_operating_system Manual Drivers folder and open the 32-bit or the 64-bit folder, depending on your system type. Note: To view your system type, click Start . Right-click Computer , and then click Properties . Click the Ax88179_178a file. Click OK , and then click Next .
How do I install my network card in Mac OSX 10.6.x - 10.9.x?
Download the latest drivers from the StarTech.com website at www.startech.com/Support . The part number and product ID are on the product packaging. Note: Mac OS X usually saves the files to the Downloads folder that is associated with your user account and is located on the drive where Mac OS X is installed (for example, Macintosh HDUsers your_name Downloads). Double-click the [ASIX88179] Mac USB Network Adapter.zip file. Press and hold the Control key and click the dmg file. To mount a drive on the desktop, click Open . Double-click the drive that you just mounted on the desktop. Press and hold the Control key and click the setup file. Click Open . Complete the instructions to install the device drivers, and restart your computer when prompted to. After your computer restarts, connect the device to your computer.
Why did the software not install properly in macOS High Sierra (10.13) or later?
Starting in High Sierra 10.13, macOS enforces stricter security policies than previous revisions. As a result of these changes, software packages, like those used in this installation, will need to be allowed within the macOS Security and Privacy settings, immediately after the software has been installed, in order for the device to operate. To allow the software, follow these steps after you've completed installation on your Mac: Open System Preferences . Open Security & Privacy . Click the Allow button near the bottom of the General tab. Note: The option to allow the software will be available within the Security & Privacy settings for 30 minutes. If the software is not allowed within that time frame, the software must be reinstalled in order for macOS to grant the opportunity to allow it again.
I'm having difficulty setting up Wake On LAN. What should I know?
The chipset in this product supports Wake on LAN as does its firmware. The computer will require specific configuration in the driver settings and system BIOS/UEFI for Wake On LAN to function. Some Dell systems may not work with this feature as mentioned in this Dell article .
Everything is hooked up but nothing is working. What should I do?
When you troubleshoot issues with a network adapter, there are some quick tests that you can complete to rule out potential problems. You can test to make sure that the following components are working correctly and are not the source of the issue: Ethernet cables Network devices Computer system To test your setup components, try the following: Use the Ethernet cables, network devices, and computer system in another setup to see if the problem is with the components or the setup. Use different Ethernet cables, network devices, and a different computer system in your setup to see if the problem persists. Ideally, you should test a component that you know works in another setup. When you test your cables, it is recommended that you do the following: Test each cable individually. Use short cables when you are testing. When you test the Ethernet cables, network devices, and computer system, it is recommended that you do the following: In Device Manager , check under Network Adapters . To open Device Manager , press the Windows key + R , type devmgmt.msc , and press Enter . If you are using a USB network adapter and you do not see the network adapter listed in Device Manager , refer to the following FAQ: https://www.startech.com/en-us/faq/usb-cannot-detect-windows . If you are using a PCI/PCIe network adapter and you do not see the network adapter listed in Device Manager , refer to the following FAQ: https://www.startech.com/en-us/faq/pci-pcie-cannot-boot-os-or-detect-windows . If you are using a CardBus/ExpressCard adapter and you do not see the network adapter listed in Device Manager , refer to the following FAQ: https://www.startech.com/en-us/faq/cb-ec-cannot-detect-windows . If the device is listed with an error, follow the instructions on the product page to reinstall the drivers. Check to see if your network devices (for example, a network switch, router, and so on) use compatible protocols (for example, 10/100, Gigabit, and so on). Make sure that the link LEDs on the adapter are illuminated when it is plugged into a network device. If the link LEDs are illuminated, it means that a good electrical connection exists between the devices. If you use a wall jack with an Ethernet cable, make sure that the jack is patched in properly.
I am having issues with my new network interface card (NIC) and my on-board NIC is still enabled. What do I do in Windows?
Sometimes an on-board network interface card (NIC) conflicts with a new NIC. In these cases it is best to disable the on-board NIC. The best way to disable your on-board NIC is to go into your BIOS and disable it there if possible. To do this, consult your motherboard manual. You can also disable any NIC in Windows. Here is how you do this: First click Start , or, in Windows 10 and 8, hold down the Windows key and press X . Then click Control Panel . Windows 10 Click Network and Internet . Click Network and Sharing Center . On the left, click Change adapter settings . Right-click the NIC that you would like to disable and select Disable . Windows 8 Click Network and Sharing Center . On the left, click Change adapter settings . Right-click the NIC that you would like to disable and select Disable . Windows 7 Click Network and Internet . Click Network and Sharing Center . On the left, click Change adapter settings . Right-click the NIC that you would like to disable and select Disable . Windows Vista Click Network and Sharing Center . On the left, click Manage network connections . Right-click the NIC that you would like to disable and select Disable . Windows XP Click Network Connections . Right-click the NIC that you would like to disable and select Disable .
Why do I have speed or connectivity issues?
If you are experiencing speed or connectivity issues, it is best to set a specific speed at half or full duplex in your settings. You can set your network adapter to perform at a certain speed, but the device that the adapter is connected to (whether it is a router, switch, or computer) must also be able to perform at the same speed. Note : You must log in as the local administrator before you continue. To open Device Manager: Press Windows key + R . Type devmgmt.msc . Click OK . Open the Networking adapters section. Right-click the network adapter that you want to change and select Properties . Click the Advanced tab. Scroll down to Speed & Duplex . By default, it is set to Auto-Negotiate . Select any of the speeds that you see in the list. Click OK and restart your computer.
Why does my USB device stop working after my computer wakes back up from sleep mode in Windows?
If the USB device does not work after your computer has been in extended hibernation, it is likely that Windows has automatically turned off the USB Root hub to save power. The steps below outline how to configure the USB root hub to stay on during hibernation, to prevent this from happening. Windows 10 / 8 On your keyboard, press the Windows key + X and select Control Panel . Click Hardware and Sound , then click Power Options . Click Change plan settings for the plan you want to change. Click Change advanced power settings . Click the plus sign (+) next to “USB settings” and “USB selective suspend setting” to expand the options and change the setting to Disabled . Click OK to apply the setting. Note : You may need to disconnect and re-connect your USB device after applying these settings to re-establish the connection. Windows 7 / Vista Click the Start button and select Control Panel . Click Hardware and Sound , then click Power Options . Click Change plan settings for the plan you want to change. Click Change advanced power settings . Click the plus sign (+) next to “USB settings” and “USB selective suspend setting” to expand the options and change the setting to Disabled . Click OK to apply the setting. Note : You may need to disconnect and re-connect your USB device after applying these settings to re-establish the connection. Windows XP On your desktop, right-click the My Computer icon and select Properties . Click the Device Manager tab. Expand Universal Serial Bus controllers by clicking the arrow to the left of it. Right-click the first USB Root Hub device and select Properties . Click the Power Management tab. Clear the box next to Allow the computer to turn off this device to save power . Click OK to apply the setting. Repeat steps 4-7 for any remaining devices in the Universal Serial Bus Controllers section with “ Root Hub ” in the name. Note : You may need to disconnect and re-connect your USB device after applying these settings to re-establish the connection.
I'm having difficulty setting up Wake On LAN. What should I know?
The chipset in this product supports Wake on LAN as does its firmware. The computer will require specific configuration in the driver settings and system BIOS/UEFI for Wake On LAN to function. Some Dell systems may not work with this feature as mentioned in this Dell article .
Can I use my network card for a Preboot Execution Environment (PXE)?
StarTech.com does not support a Preboot Execution Environment (PXE) as this requires third-party software. However, our devices can be used as long as the following conditions are met: The BIOS must support PXE. The BIOS must see the card. The environment must have drivers for the chipset used in the card. If using a USB networking card, the environment must have support for USB devices as well.
How to Set a Virtual Local Area Network (VLAN) Tag With a Network Card in Windows
Virtual local area network (VLAN) tagging requires that the network interface card (NIC) and the router or switch that you use support protocol IEEE 802.1q. Depending on the NIC, you can set your VLAN ID in Device Manager. Not all NICs that support VLAN tagging have this option. Setting your VLAN ID in Device Manager Note: Log in as the local administrator before continuing. To open Device Manager: Press Windows key + R Type devmgmt.msc Click OK . In Device Manager, open Network adapters . Right-click on the NIC and choose Properties . Click the Advanced tab. Scroll down to VLAN ID . Set the ID that you would like the NIC to have and click OK . Setting up your VLAN Tagging and Setting a VLAN ID How you perform this task depends on your router or switch. Consult the manual or manufacturer of your router or switch for more details. In your router or switch, you can VLAN tag a device by the VLAN ID if you set one previously, or by the MAC address of the computer. Your router or switch will list all IP devices by MAC address. For products related to this article, click here .
How do I confirm that Windows detects my USB device?
To confirm that Windows detects your USB device, complete the following: Press the Windows key+ R , type devmgmt.msc , and press Enter . In Device Manager , under the appropriate heading, confirm that your expansion card is listed and that there isn't an exclamation mark next to it. For example, a USB controller card would be under Universal Serial Bus controllers . Your USB device is listed according to the name of the chipset. To determine the name of the chipset of your USB device, navigate to www.StarTech.com and look on the Technical Specifications tab for your product.
Related products
-
2.5GbE USB-C to Ethernet Adapter with USB-A Converter, NBASE-T NIC, USB 3.0 Type-C 2.5/1G Multi Speed Network, Thunderbolt Compatible, Windows & Mac
$36.89 Add to cart -

USB 3.0 to Fiber Optic Converter - 1000Base-SX SC
$301.34 Add to cart -

Thunderbolt 3 to Ethernet Adapter, 10GbE - Multi-Gigabit, Thunderbolt 3 to RJ45 Network Adapter - 10GBASE-T/5-2.5GBASE-T NIC - 10G Network Adapter w/ TB3-Certified Cable, Win/Mac - TAA
$255.21 Add to cart -
USB 3.0 to Gigabit Ethernet NIC Network Adapter with 3 Port Hub - White
$66.61 Add to cart