
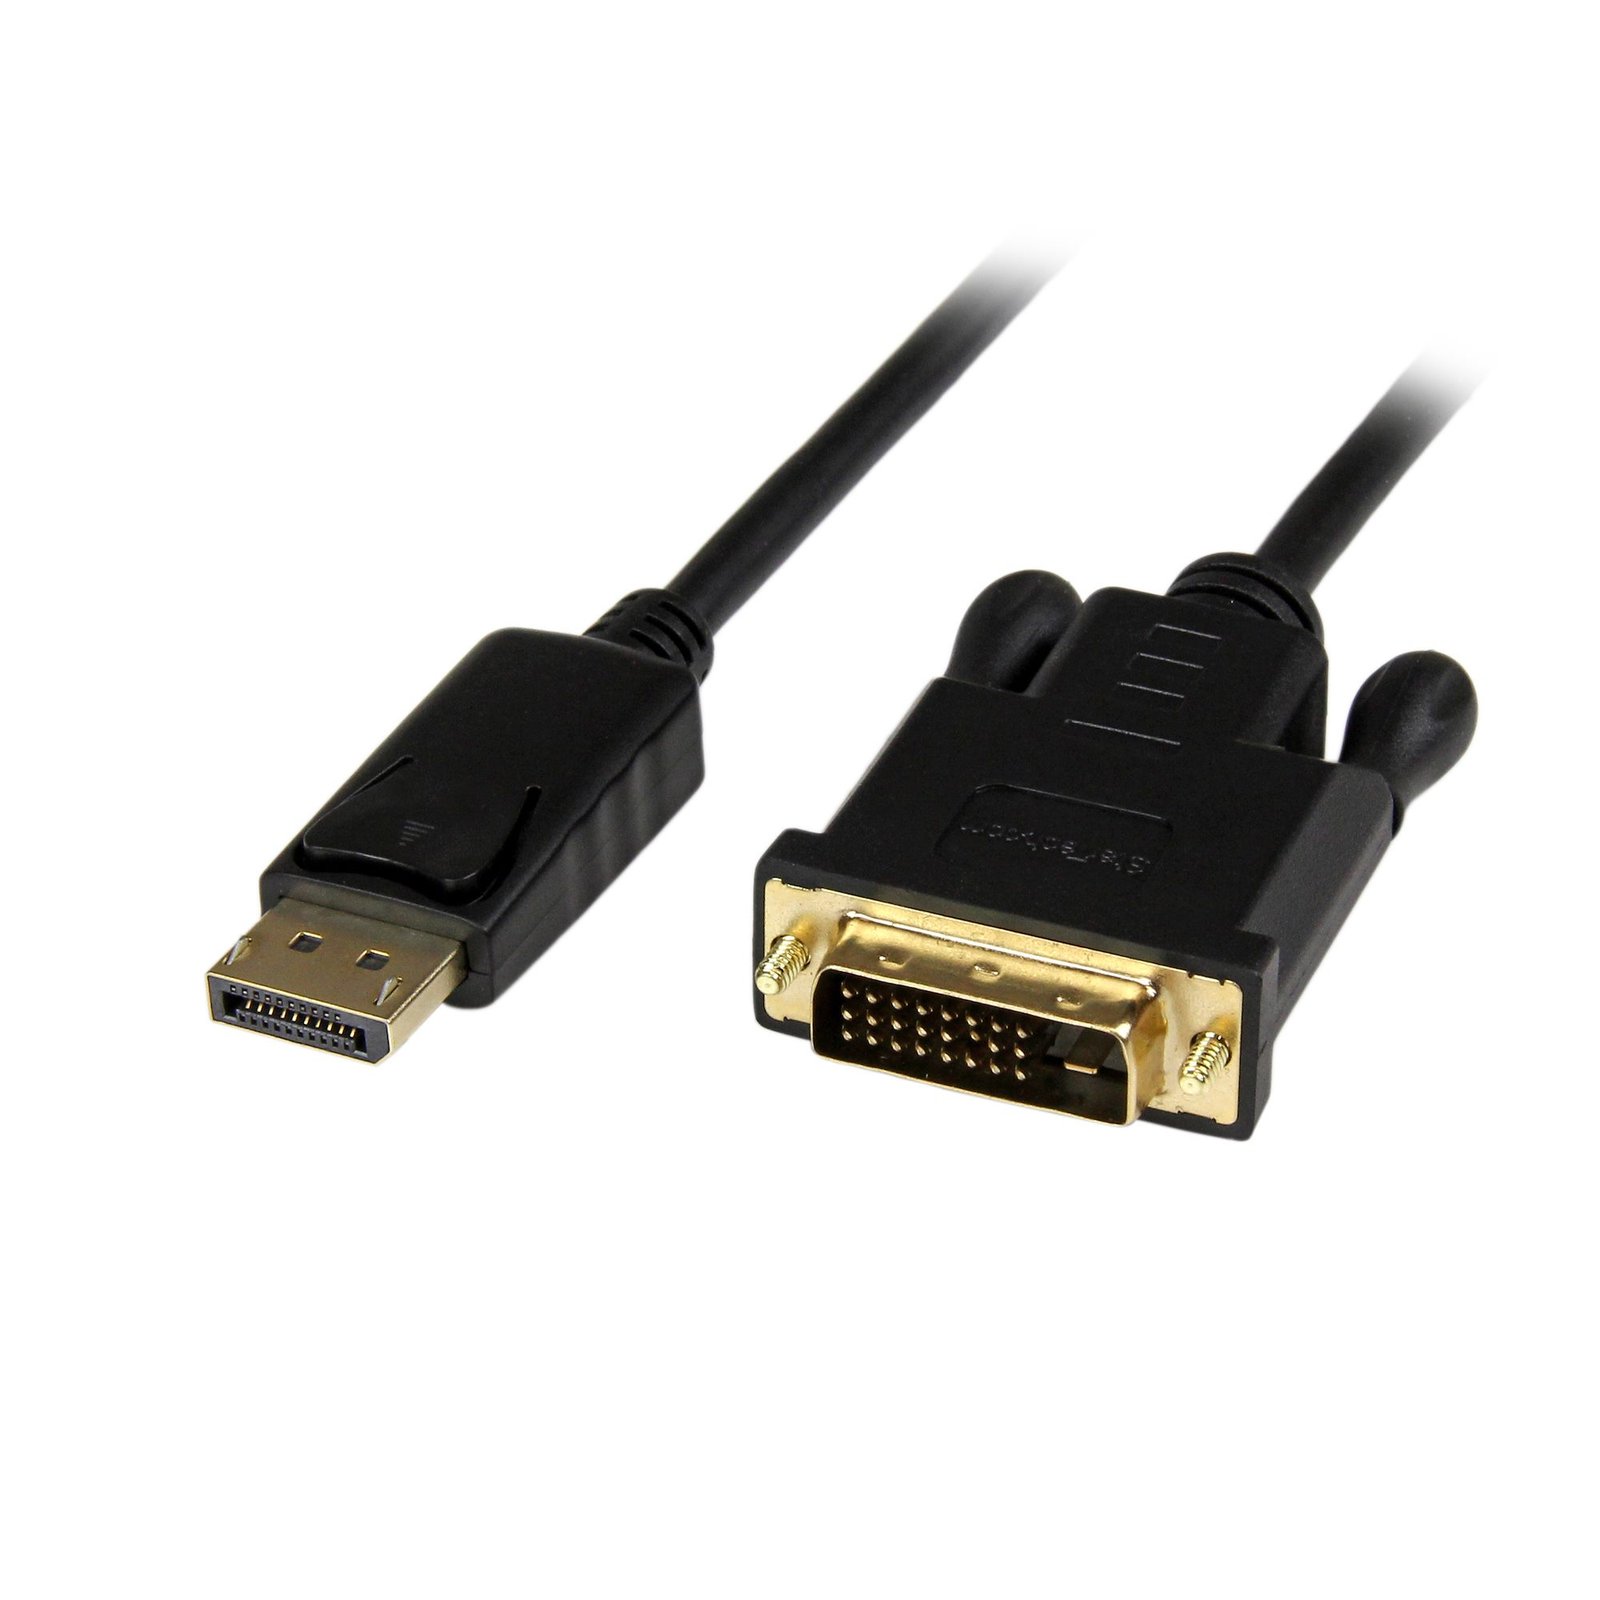
3ft (1m) DisplayPort to DVI Cable - 1080p Video - Active DisplayPort to DVI Adapter Cable - DisplayPort to DVI-D Cable Converter Single Link - DP 1.2 to DVI Monitor Cable
$33.81
Eliminate excess cable clutter with a short 3ft DisplayPort to DVI active adapter
Specifications & Compliance
- UPC
- 065030854900
- Brand
- StarTech.com
- Included in Package
- 1 - Active DisplayPort to DVI Adapter
- Shipping (Package) Weight
- 3.2 oz [92 g]
- Weight of Product
- 2.8 oz [80 g]
- Product Length
- 36.0 in [91.5 cm]
- Product Width
- 1.6 in [40.0 mm]
- Product Height
- 0.6 in [15.0 mm]
- Package Depth
- 7.9 in [20 cm]
- Package Width
- 7.0 in [17.7 cm]
- Package Height
- 1.0 in [26 mm]
- Color
- Black
- Warranty
- 3 Years
- Connector 1
- DisplayPort
- Connector 1 (Quantity)
- 1
- Package Quantity
- 1
- Connector 2
- DVI-D Dual-Link (25-Pin)
- Connector 2 (Quantity)
- 1
- Operating Temperature
- 0°C to 60°C (32°F to 140°F)
- Storage Temperature
- -10°C to 70°C (14°F to 158°F)
- Humidity
- 40%-85%RH
- Chipset ID
- Parade - PS171
- MTBF
- 1,291,679 hours
- System and Cable Requirements
- Some dual-link DVI monitors manufactured prior to 2014 may have limited resolutions support when used with this adapter., This adapter is not compatible for use with the Apple Cinema Display.
- Maximum Digital Resolutions
- 1920 x 1200
- Audio
- No
- Number of Displays
- 1
- AV Input
- DisplayPort - 1.2
- AV Output
- DVI-D - Single-Link
- Wide Screen Supported
- Yes
- Active or Passive Adapter
- Active
- Supported Resolutions
- 1024 x 768<br> 1280 x 720<br> 1920 x 1080<br> 1920 x 1200
- Audio Specifications
- DVI - No Audio Support
- HDR Support
- No
Questions & Answers
Does this device require drivers or additional setup?
No. This device is plug and play and does not require drivers or additional software. Simply connect the source device and the destination device to begin using it. Explanation: This device is designed for plug-and-play operation and is automatically recognized by the connected system. To use the device: Connect the source device (such as a computer). Connect the destination device (such as a monitor, projector, or other compatible peripheral). Power on the connected devices, if required. No driver installation, software configuration, or additional setup is necessary. If the device is not detected, verify that: All cables are securely connected. The source and destination devices are compatible with the product. The correct input and output ports are being used.
No video signal is appearing on my display. How do I fix this?
Check that the device is not being used in reverse. The display does not support the resolution set within Display Settings. Adjust the resolution to be the exact resolution and refresh rate recommended by the display manufacturer.
Everything is hooked up but nothing is working. What should I do?
When you troubleshoot issues with a video adapter, there are some quick tests that you can complete to rule out potential problems. You can test to make sure that the following components are working correctly and are not the source of the issue: Video cables Video adapter Video source (such as a DVD player or computer) Video destination (such as a monitor or projector) To test your setup components, try the following: Use the cable, video adapter, video source, and video destination in another setup to see if the problem is with the components or the setup. Use a different cable, video adapter, video source, and video destination in your setup to see if the problem persists. Ideally, you should test a component that you know works in another setup. When you test your cables, it is recommended that you do the following: Test each cable individually. Use short cables when you are testing. When you test the video source and video destination, it is recommended that you do the following: Remove the video adapter from your setup and test to make sure that the video source and video destination work together without the video adapter. Test to make sure that the video source and video destination work together at the resolution that you want to use. Note: In order for your setup to work properly, the video source, adapter, and destination all need to support the resolution that you are using.
The monitor is not getting a signal and there is no error on the monitor. What do I do?
Try the following: Check that the monitor’s video port works with another source. Check that the cables between the source and the destination work with other equipment. Check whether the video adapter works with another source and another destination. NOTE: Thunderbolt 3 to DisplayPort video adapters will require active adapters to convert from DisplayPort to DVI or HDMI.
What to do When the Monitor is Not Getting a Signal and the Monitor Says “Out of Range"
The error “Out of Range” normally means that the resolution being output by the computer is not compatible with the display. Try lowering the resolution to see if that helps resolve the issue. You may need to connect another monitor or restart the computer or source to accomplish this.
How to Arrange Windows Monitors to Fix Mouse Issues
In order for your mouse to move properly between your monitors you must rearrange your monitors in Windows to match the physical location of your monitors on your desk. To do so, complete the following based on your operating system: Windows 11 Click on the Windows Icon in the Taskbar (or the Windows key on the keyboard) and search for Display Settings . Click on Multiple Displays. Click Identify to display the numbers on each connected monitor, showing how the operating system has assigned their positions. Click and drag the monitor icons to best match your physical setup. Click Apply to confirm the changes and close the window. Windows 10 and Windows 8 On your keyboard, press the Windows key + X and select Control Panel . Click Appearance and Personalization , then click Display . Click the Resolution or Adjust Resolution option from the left column, which will display your monitors as numbered icons. Click Identify to display the numbers on each connected monitor, showing how the operating system has assigned their positions. Click and drag the monitor icons to best match your physical setup. Click OK to apply the changes and close the window. Windows 7 and Windows Vista Click the Start button and select Control Panel . Click Appearance and Personalization, then click Display . Click the Resolution or Adjust Resolution option from the left column, which will display your monitors as numbered icons. Click Identify to display the numbers on each connected monitor, showing how the operating system has assigned their positions. Click and drag the monitor icons to best match your physical setup. Click OK to apply the changes and close the window. Windows XP Click the Start button and select Control Panel . Double-click Display . Click the Settings tab, which will display your monitors as numbered icons. Click Identify to display the numbers on each connected monitor, showing how the operating system has assigned their positions. Click and drag the monitor icons to best match your physical setup. Click OK to apply the changes and close the window. To mirror the image from your primary monitor instead of extending your desktop, refer to the following FAQ: http://www.startech.com/faq/Windows_Mirroring_Monitors
Why is my DisplayPort converter not passing audio?
If a DisplayPort converter with audio is not passing sound from the source to the destination, complete the following: Make sure that the DisplayPort connection on the video card is the default audio playback device. Make sure that the video card has the DisplayPort audio codec installed. If not, visit the video card manufacturer's website to find out how to update the video card driver.
How do I configure additional displays in Windows?
Windows 11 To configure displays in Windows 11, complete the following: Press the Windows + I (capital letter i) keys together to open Settings Click 'System' > 'Display' Click 'Duplicate these displays' and choose 'Extend these displays' (if needed). Click ‘Identify’ to determine the number assigned to each display. Drag and drop each display accordingly to the physical layout on your desk. Click the Apply button. Windows 10 To configure displays on Windows 10, complete the following: Press the Windows + I (capital letter i) keys together. Click 'System' > 'Display' Under the ‘Multiple displays’ section, select ‘Extend Desktop To This Display.’ Click ‘Identify’ to determine the number assigned to each display. Drag and drop each display accordingly to the physical layout on your desk. Click the Apply button.
How do I arrange extended displays on macOS?
To arrange extended displays on macOS, complete the following. Navigate to the Apple Menu > System Preferences, click Displays , then click Arrangement . Make sure that the ‘ Mirror Displays ’ checkbox is not selected. Click on each display to determine what number each display is assigned to. Drag and drop each display accordingly to the physical layout on your desk.
Does this device support bidirectional conversion?
No, this device does not support bidirectional conversion. It is designed to operate in one direction only. Explanation This device converts signals from a specific input (source) to a specific output (destination) . It cannot reverse the signal path or function in the opposite direction. The supported direction of conversion is determined by the product’s design and is clearly indicated in the product title and technical specifications. Attempting to use the device in reverse is not supported and will not function.
How can I identify which DVI connector type I have or need?
You can identify the DVI connector type by the pin configuration and determine compatibility based on whether the connection supports analog, digital, or both signal types. Explanation: DVI (Digital Visual Interface) connectors are defined by their pin layout and supported signal type. The main DVI connector types are: DVI-A (17 pin) . Analog signal only DVI-D Single Link (19 pin) . Digital signal only DVI-D Dual Link (25 pin) . Digital signal only, higher bandwidth DVI-I Single Link (23 pin) . Supports both analog and digital signals DVI-I Dual Link (29 pin) . Supports both analog and digital signals, higher bandwidth DVI-A is used for analog signals (similar to VGA), while DVI-D is used for digital signals (similar to HDMI). DVI-I connectors can carry both analog and digital signals, but actual support depends on the device’s specifications. Single Link and Dual Link indicate bandwidth capacity, which affects maximum supported resolution. Typical limits are up to 1920 × 1080 @ 60 Hz for Single Link and up to 2560 × 1600 @ 60 Hz for Dual Link. However, actual resolution support depends on the capabilities of the connected devices, not just the connector type. To ensure compatibility, verify both the connector type and the signal support in the specifications of the source and display devices.
What is the difference between a passive and active DisplayPort adapter?
Passive and active DisplayPort adapters are used to convert DisplayPort or Mini DisplayPort signals to other video formats such as HDMI, DVI, or VGA. The correct adapter type depends on whether the DisplayPort source supports DisplayPort Dual-Mode (DP++). Passive adapters rely on the source device to perform the conversion, while active adapters perform the conversion internally. Explanation: When connecting a DisplayPort or Mini DisplayPort source to a monitor that uses HDMI, DVI, or VGA, it is important to determine whether a passive or active adapter is required. Passive DisplayPort Adapters Passive adapters do not contain signal conversion hardware. Instead, they rely on the DisplayPort source device to output a compatible HDMI or DVI signal using DisplayPort Dual-Mode (DP++). Passive adapters can be used when: The DisplayPort source supports DP++ Converting from DisplayPort to HDMI Converting from DisplayPort to DVI Because passive adapters do not contain conversion circuitry, they are typically less expensive than active adapters. Many DP++ ports are identified by the DisplayPort Dual-Mode (DP++) logo. Refer to the device documentation to confirm DP++ support. Active DisplayPort Adapters Active adapters contain integrated conversion circuitry that converts the DisplayPort signal to another video format. Active adapters can be used when: The DisplayPort source does not support DP++ Converting from DisplayPort to VGA Connecting displays in environments that require active signal conversion Multi-monitor configurations where passive adapter limitations may apply Because active adapters perform the signal conversion internally, they generally provide broader compatibility but are typically more expensive than passive adapters. Multi-Monitor Considerations For multi-monitor installations, active adapters may be required depending on the capabilities of the graphics hardware. Some graphics cards have limits on the number of displays that can be driven through DP++ outputs simultaneously. In these situations, active adapters may be necessary to support the desired monitor configuration. Always verify the display limitations and adapter requirements specified by the graphics card manufacturer. Thunderbolt Compatibility Thunderbolt ports natively support DisplayPort technology and generally support DP++ functionality. However, multi-monitor configurations may still require active adapters depending on the system design and display setup. MST Hub Compatibility When using StarTech.com MST hubs: Passive adapters are generally recommended for HDMI and DVI displays. Active adapters are required when converting from DisplayPort to VGA. Microsoft Surface Dock Compatibility Microsoft recommends using active video adapters with certain Surface Dock models if display issues occur when using passive adapters. This recommendation applies to supported Surface Dock products but does not apply to the Surface Pro 3 Docking Station.
Related products
-
Compact DisplayPort to DVI Adapter - DisplayPort to DVI-D Adapter/Video Converter 1080p - DP to DVI Monitor/Display Adapter Dongle - DP to DVI Adapter - Latching DP Connector
$19.99 Add to cart -
10ft (3m) DisplayPort to DVI Cable - DisplayPort to DVI Adapter Cable 1080p Video - DisplayPort to DVI-D Cable Single Link - DP to DVI Monitor Cable - DP 1.2 to DVI Converter
$34.84 Add to cart -

3ft (91cm) DisplayPort to DVI Converter Cable - 1920x1200
$24.59 Add to cart -
DisplayPort to HDMI Adapter - DP 1.2 to HDMI Video Converter 1080p - DP to HDMI Monitor/TV/Display Cable Adapter Dongle - Passive DP to HDMI Adapter - Latching DP Connector
$19.46 Add to cart