
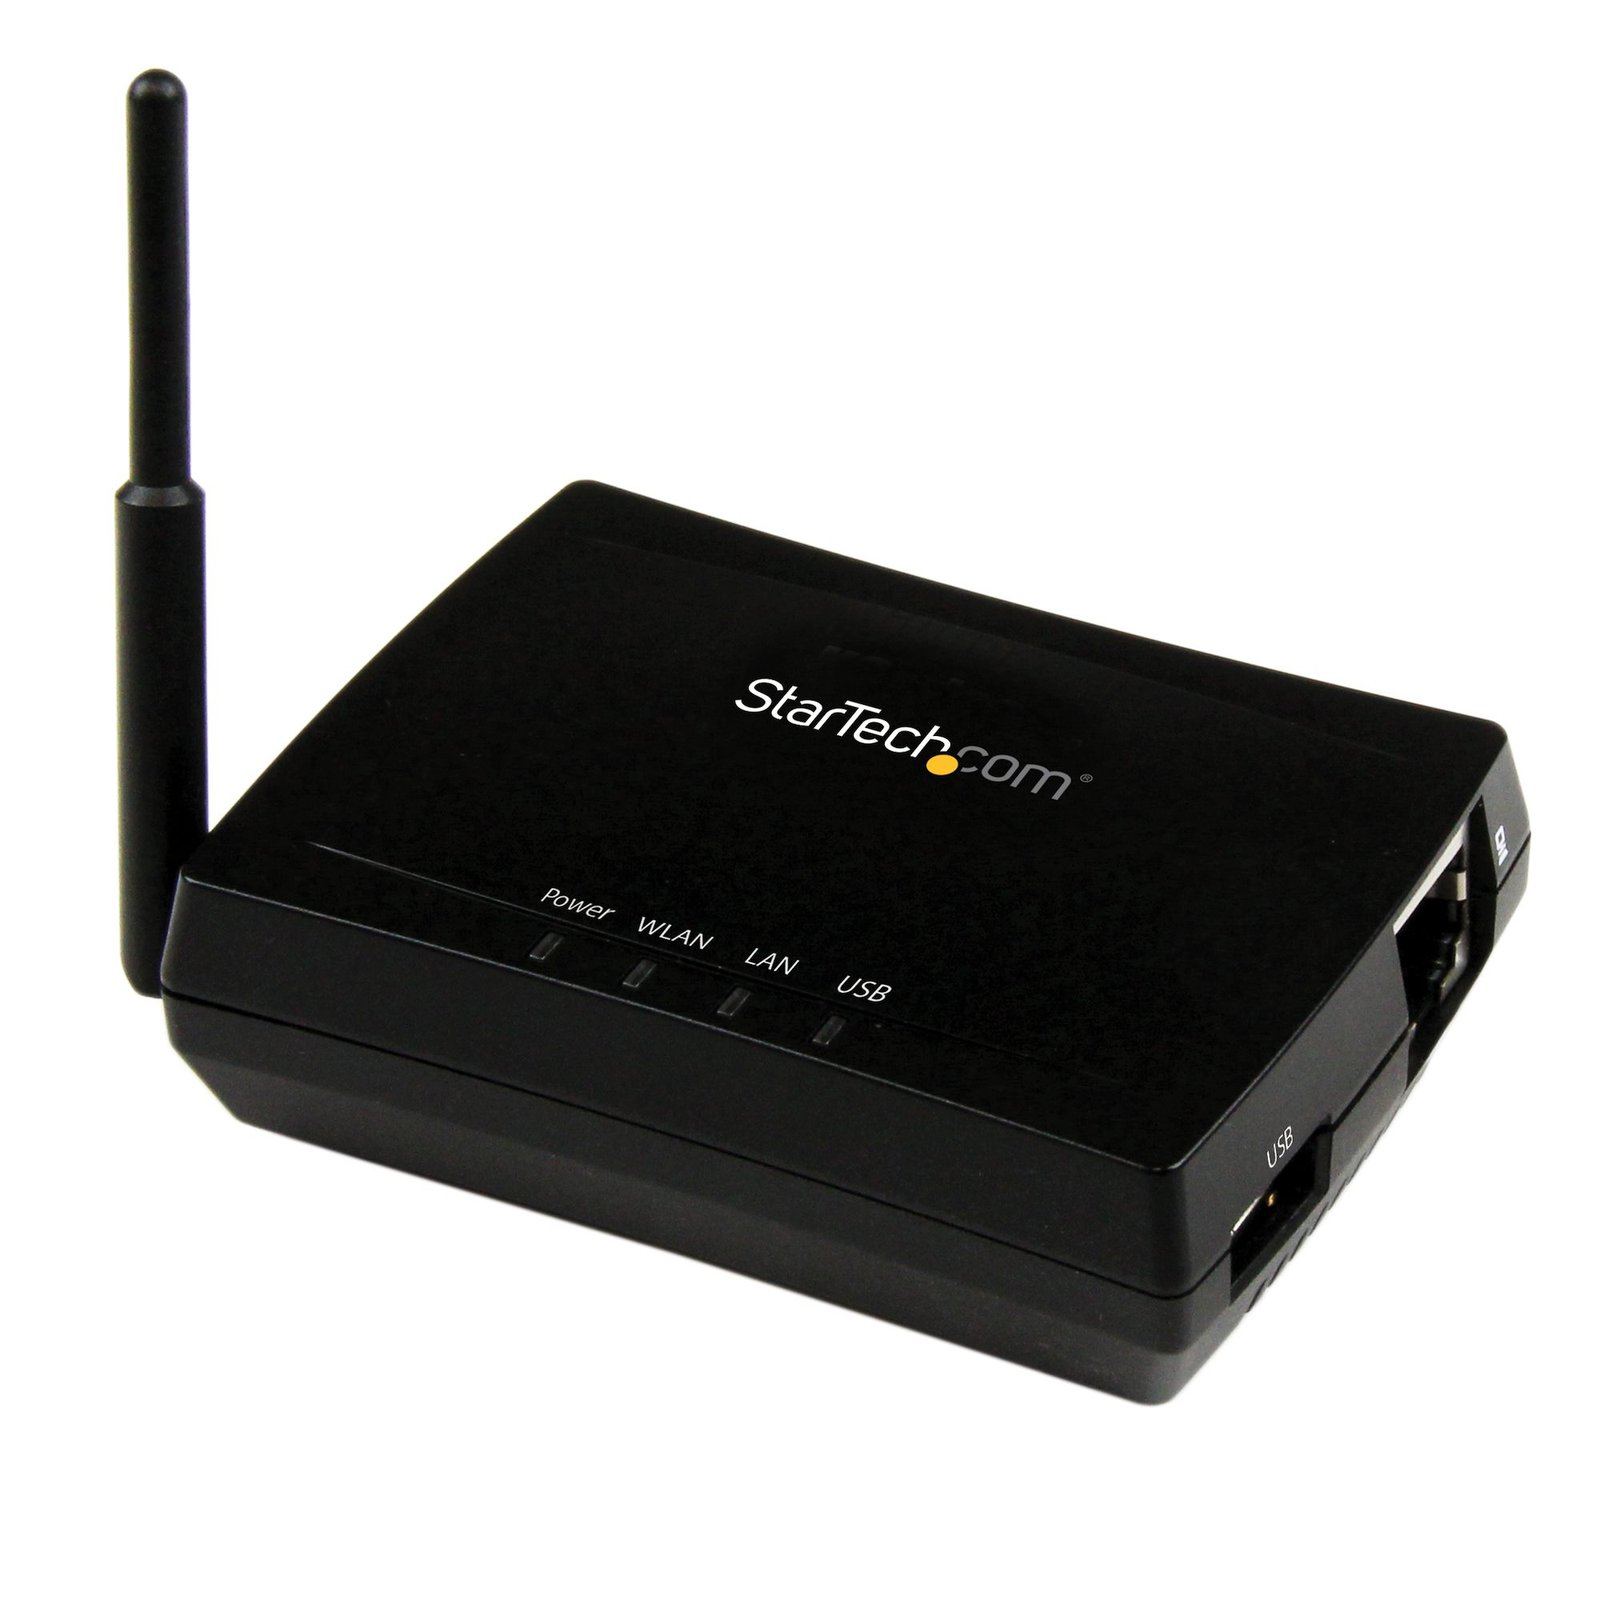
1 Port USB Wireless-N 150Mbps AirPrint Server - 802.11b/g/n
$100.99
Print directly from your iPhone® / iPod touch® / iPad® devices to a standard USB printer
Specifications & Compliance
- UPC
- 065030855143
- Brand
- StarTech.com
- Included in Package
- 1 - Wireless-N USB 2.0 AirPrint™ Server, 1 - Universal Power Adapter (NA/UK/EU), 1 - Driver CD, 1 - Instruction Manual
- Shipping (Package) Weight
- 11.4 oz [324 g]
- Weight of Product
- 2.0 oz [56 g]
- Product Length
- 3.3 in [85 mm]
- Product Width
- 2.2 in [57 mm]
- Product Height
- 0.9 in [24 mm]
- Package Depth
- 5.9 in [15 cm]
- Package Width
- 8.7 in [22 cm]
- Package Height
- 2.0 in [50 mm]
- Color
- Black
- Warranty
- 2 Years
- Connector 1
- USB-A (480Mbps, 2.5W)
- Connector 1 (Quantity)
- 1
- Package Quantity
- 1
- Connector 2
- RJ-45
- Connector 2 (Quantity)
- 1
- Operating Temperature
- 0°C to 40°C (32°F to 104°F)
- Storage Temperature
- -10°C to 60°C (14°F to 140°F)
- Humidity
- 0~70% RH
- Material
- Plastic
- Maximum Data Transfer Rate
- 150 Mbps
- Industry Standards
- IEEE 802.3 10BASE-T, IEEE 802.3u 100BASE-T, IEEE 802.11b/g/n Wireless
- Power Source
- AC Adapter Included
- Special Notes
- AirPrint is an Apple® technology that is supported on the iPad (all models), iPhone (3GS or later) and iPod touch (3rd generation or later), OS Compatibility refers to the included software only – the Print Server itself can be used without software on any platform that supports network printing, Supports most standard USB printers (For a list of compatible printers, see support documentation)
- Input Voltage
- 100 - 240 AC
- Output Voltage
- 5 DC
- Connector 3
- Wi-Fi 4 (802.11n, 600Mbps)
- Connector 3 (Quantity)
- 1
- LED Indicators
- 1 - Power, 1 - WLAN, 1 - LAN, 1 - USB
- Number of Ports
- 1
- Interface
- USB 2.0, RJ45 (10/100 Ethernet), Wireless Ethernet
- Input Current
- 0.2 A
- Output Current
- 1
- Plug Type
- M
- Center Tip Polarity
- Positive
- Supported Protocols
- TCP/IP
- Security Features
- WEP Data Encryption, WPA Data Encryption, TKIP/AES, WPA and WPA2-PSK Data Encryption
- Frequency
- 2.4 GHz
Questions & Answers
How do I add a printer from a print server in Windows 10 or Windows 11?
Yes, you can add a printer from a print server in Windows 10 or Windows 11 by creating a Standard TCP/IP printer port and configuring the port to use the LPR protocol. Explanation: Before creating the printer port, make sure the network configuration for the print server is complete and that the print server can be reached from the Windows computer. For information about configuring the print server, see: http://www.startech.com/faq/print_servers_alternate_setup To confirm that the print server can be reached from the computer, perform a ping test: https://www.startech.com/en-us/faq/ping-test-windows-mac-os To add the printer in Windows 10 or Windows 11, complete the following steps: Open Control Panel , and select Devices and Printers . Select Add a printer . Select The printer that I want isn’t listed . Select Add a printer using a TCP/IP address or hostname , and select Next . In the Hostname or IP address field, enter the IP address assigned to the print server. Select Next . Windows will detect the TCP/IP port and continue to the next screen. Set Device Type to Custom , and select Settings . On the Configure Standard TCP/IP Port Monitor screen, set Protocol to LPR . Under LPR Settings , enter lp1 in the Queue Name field, and select OK . On the Add Printer screen, select Next . Windows will attempt to detect the printer driver automatically. If Windows does not detect the printer driver, select the printer manufacturer and model from the Install the printer driver screen. If the printer manufacturer or model is not listed, select Windows Update to update the available printer models. The update may take several minutes. When the update is complete, select the printer manufacturer and model. Windows will install the printer driver. When the installation is complete, select Finish . After the printer port and driver are installed, the Windows 10 or Windows 11 computer can send print jobs to the printer through the print server.
How do I add the printer to my computer from my print server in Windows 8 / 8.1?
To add a printer from the print server to your computer, you need to create a printer port. Before you create the print server port, make sure that the network configuration is complete for your print server. For more information about how to configure your print server, navigate to the following FAQ: http://www.startech.com/faq/print_servers_alternate_setup . To confirm that the print server can be pinged from your computer, refer to the following FAQ: https://www.startech.com/en-us/support/faqs/technical?topic=networking#ping-test-windows-mac-os . To create a printer port, complete the following: Press the Windows key. Click Control Panel > Hardware and Sound > Devices and Printers > Add a printer > The printer that I want isn't listed . Select the Add a local printer or network printer with manual settings check box. Click Next . Select the Create a new port check box. Change the Type of port to Standard TCP/IP Port . In the Hostname or IP address field, enter the IP address of the print server. Click Next > Next > Finish . If prompted to, select a driver from the list or obtain a driver from the manufacturer of the printer. Click Next until you are asked if you want to print a test page. It is recommended that you send a test page to your printer to make sure that the printer port was created successfully. After the printer port is created, you can send print jobs to it.
How do I add the printer to my computer from my print server in Windows Vista / 7?
To add a printer from the print server to your computer, you need to create a printer port. Before you create the print server port, make sure that the network configuration is complete for your print server. For more information about how to configure your print server, navigate to the following FAQ: http://www.startech.com/faq/print_servers_alternate_setup . To confirm that the print server can be pinged from your computer, refer to the following FAQ: https://www.startech.com/en-us/support/faqs/technical?topic=networking#ping-test-windows-mac-os . To create a printer port, complete the following: Press the Windows key. Click Devices and Printers > Add a printer . Select the Add a local printer check box. Select the Create a new port check box. Change the Type of port to Standard TCP/IP Port . Click Next . In the Hostname or IP address field, enter the IP address of the print server. Click Next > Next > Finish . If prompted to, select a driver from the list or obtain a driver from the manufacturer of the printer. Click Next until you are asked if you want to print a test page. It is recommended that you send a test page to your printer to make sure that the printer port was created successfully. After the printer port is created, you can send print jobs to it.
How do I add the printer to my computer from my print server in Windows XP?
To add a printer from the print server to your computer, you need to create a printer port. Before you create the print server port, make sure that the network configuration is complete for your print server. For more information about how to configure your print server, navigate to the following FAQ: http://www.startech.com/faq/print_servers_alternate_setup . To confirm that the print server can be pinged from your computer, refer to the following FAQ: https://www.startech.com/en-us/support/faqs/technical?topic=networking#ping-test-windows-mac-os . To create a printer port, complete the following: Press the Windows key. Click Settings > Printers and Faxes > Add a printer > Next . Select the Local printer attached to this computer check box. Clear the Automatically detect and install my Plug and Play printer check box. Select the Create a new port check box. Change the Type of port to Standard TCP/IP Port . Click Next . In the Add Standard TCP/IP Printer Port wizard, click Next . In the Hostname or IP address field, enter the IP address of the print server. Click Next > Next > Finish . If prompted to, select a driver from the list or obtain a driver from the manufacturer of the printer. Click Next until you are asked if you want to print a test page. It is recommended that you send a test page to your printer to make sure the printer port was created successfully. After the printer port is created, you can send print jobs to it.
How do I add a printer connected to a print server in macOS?
You can add a printer connected to a print server in macOS after configuring the print server for your network. Before adding the printer, configure the print server by following the instructions in the StarTech.com FAQ: https://www.startech.com/faq/print_servers_alternate_setup . Explanation: After configuring the print server for your network, add the connected printer in macOS using these steps: Click the Apple icon. Click System Preferences > Printers & Scanners . At the bottom of the printer list, click + . On the Add screen, click IP . In the Address field, enter the IP address of the print server. From the Protocol drop-down list, select Line Printer Daemon – LPD or LPR . Enter the printer name and location in the Name and Location fields. From the Use drop-down list, select the driver for the printer. Click Add . The print server must be configured for the network before you add the connected printer to macOS.
How do I configure my StarTech.com print server without using the included print server software?
To configure the print server without using the included software, connect the print server directly to a computer using Ethernet, configure the computer to use the same IP network as the print server, and then access the print server’s web interface from a web browser. Explanation : The print server’s web interface provides network configuration options, including advanced settings such as IP configuration. This method can be used when the print server software is not supported by the application or environment. Before you begin, you need: A computer with an available Ethernet port. An Ethernet cable. The print server’s default IP address, which is provided in the product manual. Before configuring the print server, make sure it is using its default configuration. For more information about resetting the print server to its default configuration, see the following FAQ: How do I reset my print server to the factory-default configuration? . To access the print server’s web interface: Connect the print server to a power source. Connect the print server’s Ethernet port directly to the computer using an Ethernet cable. Change the computer’s IP address so that it is on the same IP network as the print server. For more information about changing the IP address, visit StarTech.com Support and enter your product ID. Make sure the computer and print server do not use the same IP address. For example, if the print server’s IP address is 192.168.1.100, configure the computer as 192.168.1.xxx, where xxx is a number from 1 to 254 other than 100. Enter the print server’s IP address in the address bar of a web browser. Use the print server’s web interface to make the configuration changes required for your network.
How do I bridge the StarTech.com PM1115UA wireless print server to my existing wireless network?
To bridge the StarTech.com PM1115UA wireless print server to an existing wireless network, configure the print server to connect to the wireless network using its SSID and security key. Then configure the PM1115UA with an IP address that is compatible with the existing network. Note: The PM1115UA must already be installed and accessible through a wired or wireless connection before completing these steps. For more information about connecting the hardware, refer to the product manual or visit: http://www.startech.com/faq/wireless_print_servers_pm1115ua_connection_information Explanation: Before configuring the PM1115UA, obtain the following information about the existing network: The wireless network SSID (network name). The wireless security key. The existing network IP configuration, such as the DHCP server IP address. This information can usually be found in the network router configuration. To connect the PM1115UA to the existing wireless network: Make sure the computer's network adapter is on the same network as the PM1115UA. By default, the PM1115UA uses the 192.168.0.XXX network. For instructions on changing the computer's IP address, visit: https://www.startech.com/en-us/faq/ip-address-change-windows-mac-os Connect an Ethernet cable between the PM1115UA and the computer. Open the StarTech.com USB Print Server Control Center software. Right-click the PM1115UA and select Configure Server . Select Connect to another AP . Locate the existing wireless network and select Select . If required, enter the wireless security key and select Connect . Wait for the PM1115UA to restart. Disconnect the Ethernet cable between the PM1115UA and the computer. Connect an Ethernet cable between the PM1115UA and the router or switch. Note: The PM1115UA may take several minutes to be detected again by the web browser. After the connection is established, the router or wireless access point should show the PM1115UA as a connected device. The PM1115UA continues to use its default IP address until the IP configuration is changed. Configure an IP address that is compatible with the existing network before adding the PM1115UA as a network printer. Although many networks dynamically assign IP addresses, a static IP address can provide a consistent address that computers can use to locate the PM1115UA. For example, a 192.168.1.1 network can use an available address in the 192.168.1.2 through 192.168.1.254 range. To configure a static IP address on the PM1115UA: Identify an available IP address that is compatible with the existing network. In WAN , clear the Automatic IP (DHCP) checkbox. Set the IP Address and Subnet Mask to values that match the network configuration. Select Update .
What is this device’s default static IP address?
This device's default static IP address is 192.168.0.100.
How do I reset my device to the default factory settings?
To reset the print server to the default configuration, complete the following: Turn on the print server and wait for it to boot up. The WLAN light is illuminated when the print server has finished starting up. Press and hold the Init button for 10 seconds Wait for the server to restart.
When should I upgrade my device's firmware?
You should not upgrade your device's firmware if you do not have any issues with the functionality of your device. The only time you should consider an upgrade is if you are experiencing a problem with the device, and you have confirmed that the firmware addresses this problem. You can confirm this is the case by reviewing the documentation included with the firmware or by consulting with our Technical Support team. Incorrectly upgrading firmware can result in diminished performance so it is best to contact StarTech.com if you would like to perform this operation.
Can I use the Ethernet port on my print server to connect to an Ethernet port on my printer?
The Ethernet port on a wireless network print server is intended to be used for configuration and to connect to an existing network infrastructure. You cannot connect an Ethernet port on a wireless network print server to the Ethernet port on a printer. The only supported method of connecting a printer to the print server is to use a USB A to B cable. These cables can be found on StarTech.com, in the USB 2.0 Cables section.
Can I use the WAN port on my print server to connect to an Ethernet port on my printer?
The print server includes a WAN port that serves as an uplink to a network infrastructure. This WAN port can use either a wireless or wired Ethernet connection, but not both simultaneously. The print server can also serve as a wireless access point by using the wired Ethernet port as an uplink (WAN). Since only one network port can be used at a time, the print server cannot make a wired Ethernet printer part of a wireless network infrastructure. To use a wired Ethernet printer in a wireless network infrastructure, you should use the USB port on the print server.
What do I need to know about connecting to my wireless print server to configure it?
By default, the PM1115UA broadcasts a wireless network SSID in infrastructure mode. When the print server is configured to broadcast an SSID (wireless network ID), the print server can only be used by one wireless network adapter. Unless the wireless network adapter is bridged into a network infrastructure, the amount of computer connections to the print server is limited to one. For most applications, the wireless network print server will need to be integrated into an existing network infrastructure. This allows different computers on your network to access your print server. For more information about how to set up bridging into another network infrastructure, visit http://www.startech.com/faq/wireless_print_servers_pm1115ua_bridging_into_network . When you want to use the PM1115UA as a wireless access point, the Ethernet port is a quick way to connect to a network infrastructure. By default, the PM1115UA, dynamically obtains an IP address from your existing network infrastructure. The IP address is bridged to the wireless network on the PM1115UA, which turns the print server into a wireless access point. If you want to have only one network SSID, you need to disable the Broadcast SSID on the print server. The PM1115UA can broadcast an SSID to be an access point and simultaneously bridge into a existing infrastructure. This allows you to extend your network infrastructure to a different SSID. To configure the print server, you need to directly connect the print server to a PC system. The default IP address is 192.168.0.100 and you need to make sure that your computer is on the 192.168.0. XXX network to make any configuration changes over Ethernet. For more information on how to change your IP address, refer to the following FAQ: https://www.startech.com/en-us/support/faqs/technical?topic=networking#ip-address-change-windows-mac-os .
How can I tell if my printer will work with this print server using AirPrint?
To confirm that your printer will work with this print server, you can consult the compatibility list StarTech.com has compiled. For more information, refer to the PM1115UA AirPrint Compatibility List . To access the compatibility list, on the product page for the PM1115UA, click the Support tab. Under Support Materials , click the .pdf file.
What DC barrel connector power plug types do StarTech.com products use, and what are their dimensions?
StarTech.com DC barrel connector plug types are defined in the “Plug Type” field of the technical specifications, using a letter code that specifies the connector’s outer diameter (OD) and inner diameter (ID) in millimeters for power adapter compatibility. Explanation: In StarTech.com technical specifications, the “Plug Type” field is a standardized identifier for the exact DC barrel connector size required to power a product. Each plug type is assigned a letter code that corresponds to a specific combination of outer diameter (OD) and inner diameter (ID), measured in millimeters. Common DC barrel plug type dimensions Plug Type OD ID A 2.35 mm 0.7 mm B 4.0 mm 1.7 mm C 4.75 mm 1.7 mm H 3.4 mm 1.3 mm L 5.0 mm 2.5 mm M 5.5 mm 2.1 mm N 5.5 mm 2.5 mm The DC barrel connector plug type must match both the outer diameter and inner diameter exactly. A mismatch between the StarTech.com product requirement and the power adapter connector can prevent proper fit or stable power delivery, which may result in device startup failure or intermittent operation. The plug type defines only the physical connector size. The plug type does not define electrical power requirements such as voltage, current, or polarity. The power adapter used with a StarTech.com product must match the product’s specified electrical requirements. Using an incompatible power adapter can cause device malfunction or permanent damage. This standardized DC barrel connector plug type system enables IT professionals and procurement teams to verify connector dimensions, ensure power adapter compatibility, standardize hardware deployments, and identify the correct replacement power supply for StarTech.com products.
Related products
-
10/100Mbps Ethernet to USB 2.0 Network LPR Print Server
$72.76 Add to cart -

Ethernet to Parallel Network Print Server, 10/100Mbps LAN, WebUI Enabled, Centronics Ethernet Printer Server Adapter, Enhances Legacy Printer, TAA
$88.14 Add to cart -

1 Port 10/100 Mbps Parallel Network Print Server
$19.99 Add to cart -

1 Port 10/100 Mbps Ethernet Parallel Network Print Server, TAA - Replaced by PM1115P3
$85.99 Add to cart