
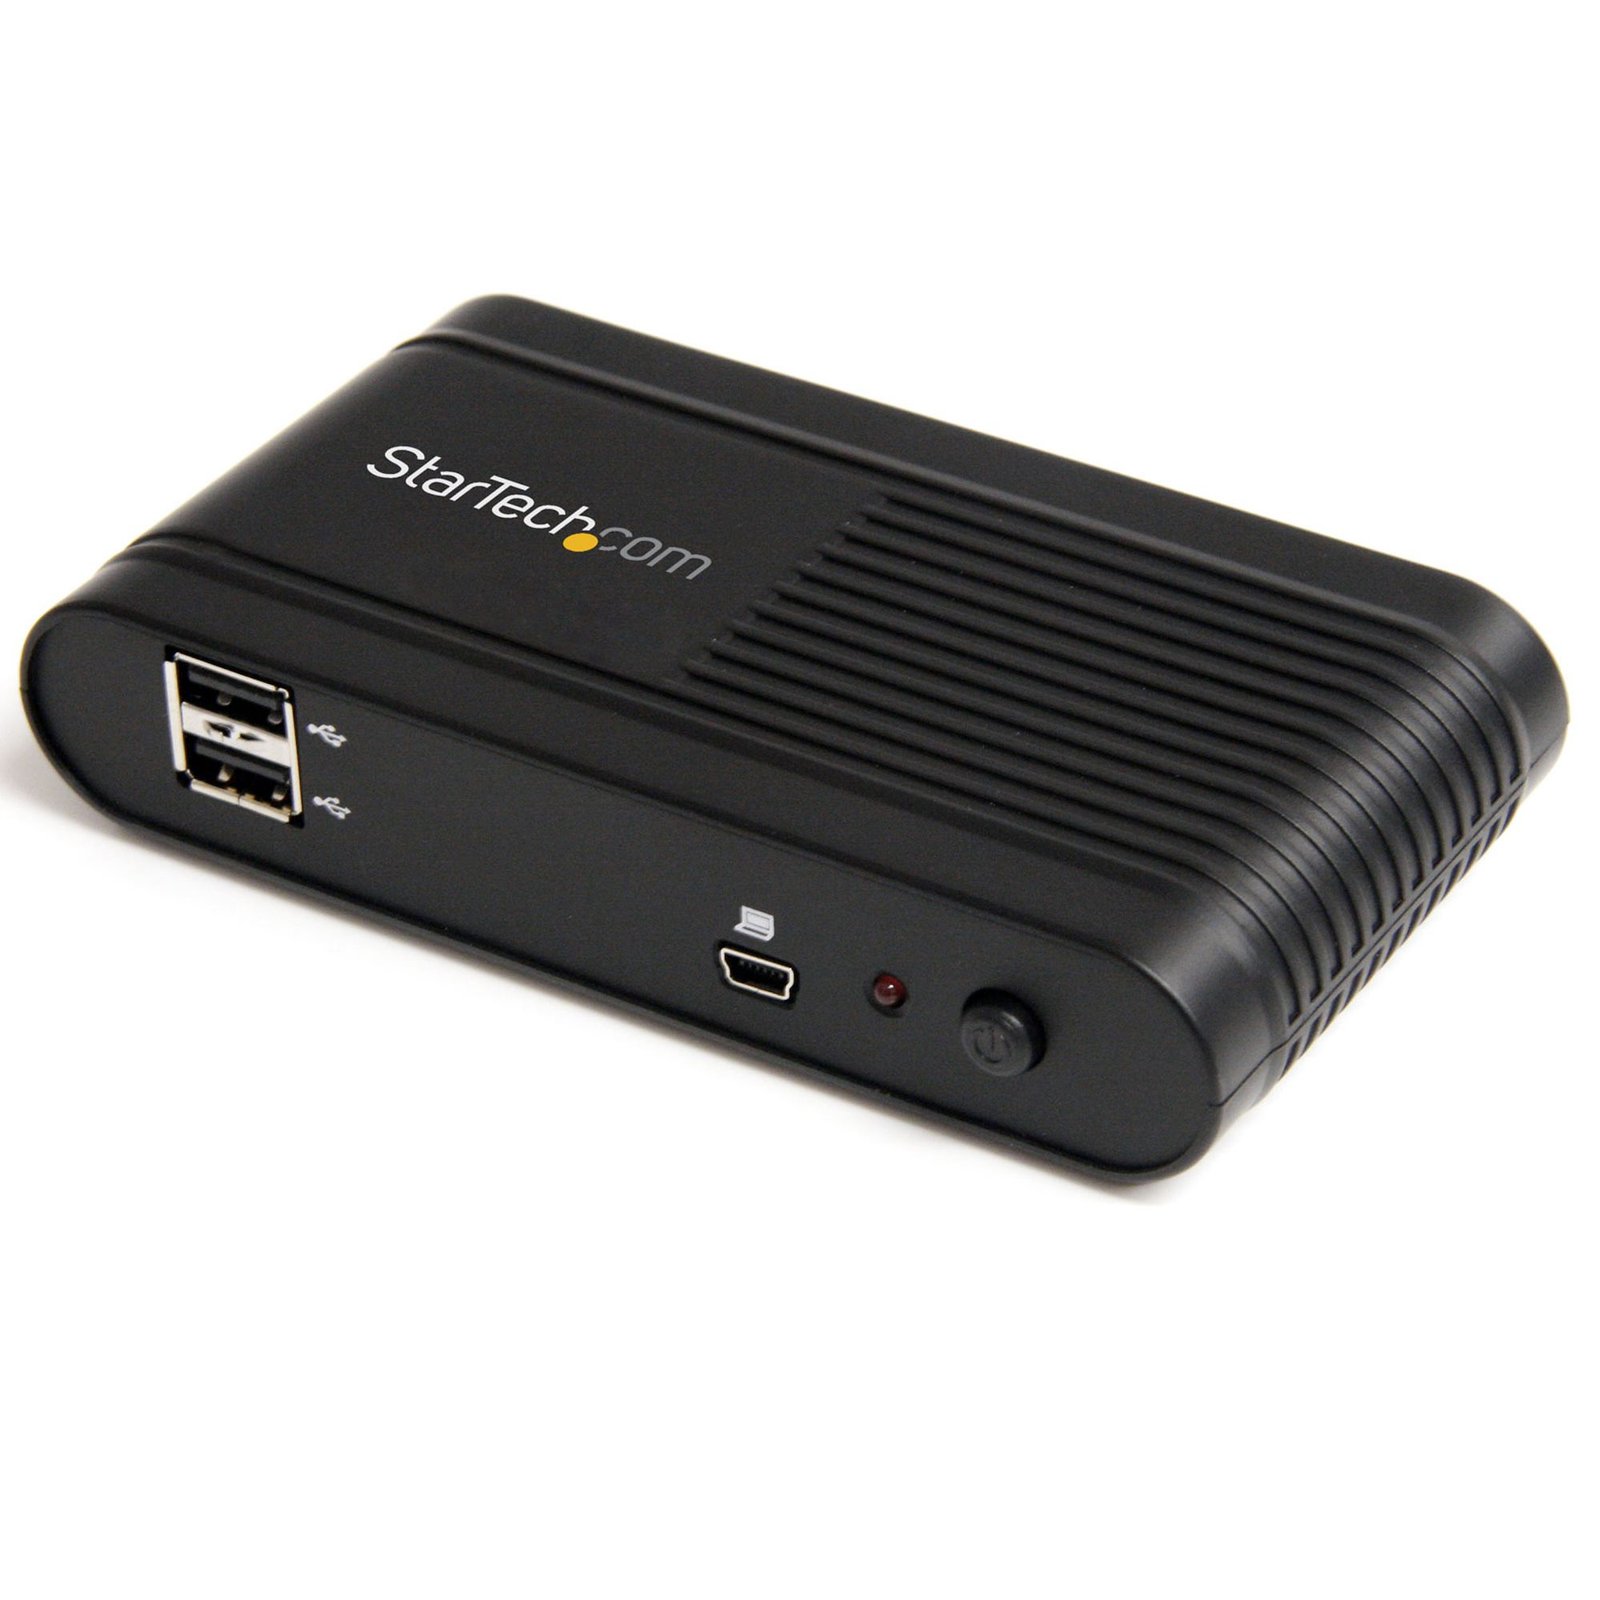
Ethernet to VGA over IP Converter
$181.99
Connect to, and share a VGA display or projector over an IP network
Specifications & Compliance
- UPC
- 065030840293
- Brand
- StarTech.com
- Included in Package
- 1 - IP or USB to VGA Video Converter, 1 - Mini USB to USB Cable, 1 - Universal Power Adapter, 1 - Driver and Software CD, 1 - Instruction Manual
- Shipping (Package) Weight
- 16.2 oz [460 g]
- Weight of Product
- 5.0 oz [142 g]
- Product Length
- 5.2 in [13.3 cm]
- Product Width
- 2.8 in [71 mm]
- Product Height
- 1.1 in [27 mm]
- Package Depth
- 5.9 in [15 cm]
- Package Width
- 9.1 in [23 cm]
- Package Height
- 2.4 in [60 mm]
- Color
- Black
- Warranty
- 2 Years
- Package Quantity
- 1
- Operating Temperature
- 0°C ~ 40°C (32°F ~ 104°F)
- Storage Temperature
- -20°C ~ 60°C (-4°F ~ 140°F)
- Humidity
- 20~90% RH (no condensation)
- Material
- Plastic
- Maximum Data Transfer Rate
- USB - 480Mbps<br> Ethernet - 1000Mbps
- Power Source
- AC Adapter Included
- Chipset ID
- DisplayLink - DL-165
- Special Notes
- VGA over Ethernet (LAN, TCP/IP) is not supported by the Mac OS
- Input Voltage
- 110V-240V AC
- Output Voltage
- 5 DC
- Power Consumption
- 10
- LED Indicators
- 1 - Power indicator
- Number of Ports
- 1
- Input Current
- 0.4A
- Output Current
- 2
- Host Connector 1
- VGA
- Host Connector 1 (Quantity)
- 1
- Audio
- Yes
- Plug Type
- M
- Center Tip Polarity
- Positive
- General Specifications
- This USB video adapter uses a DisplayLink family chipset. If you’re connecting this device to a computer along with additional USB video adapters or docking stations, please avoid using devices with a Trigger or Fresco family chipset.
- Wide Screen Supported
- Yes
- Host Connector 2
- USB Mini-B (480Mbps, 2.5W)
- Host Connector 2 (Quantity)
- 1
- Maximum Analog Resolutions
- 1920x1080
- Cascadable
- No
- Max Distance
- 100m [328ft]
- Host Connector 3
- USB-A (480Mbps, 2.5W)
- Host Connector 3 (Quantity)
- 2
- Microsoft WHQL Certified
- Yes
- Host Connector 4
- RJ-45
- Host Connector 4 (Quantity)
- 1
- Host Connector 5
- 3.5mm (3 Conductors, TRS)
- Host Connector 5 (Quantity)
- 2
Questions & Answers
How do I install my video extender in Windows Vista / 7 / 8? (.exe method)
Before you install the device, make sure that your operating system is current (for example, the most recent service pack is installed). Download the latest drivers from the StarTech.com website at http://www.startech.com/Support . The part number and product ID are on the product packaging. Note: Windows usually saves the files to the Downloads folder that is associated with your user account (for example, C:Users your_name Downloads). After the download is complete, right-click the zip folder that you downloaded, click Extract All , and complete the instructions. In the list of extracted files, right-click the Driver-Setup.exe file and click Run as Administrator . Note: If the Run as Administrator option is not available, you might be trying to run the installer from within the zipped file. Complete the instructions in step 2 to extract the files. Complete the instructions to install the device drivers, and restart your computer when prompted to. To install the USB Server software, complete the following: In the list of extracted files, open the Windows folder. In the App folder, right-click the USBServer_Setup file and click Run as Administrator . Note: If the Run as Administrator option is not available, you might be trying to run the installer from within the zipped file. Complete the instructions above to extract the files. Complete the instructions to install the USB Server, and restart your computer when prompted to. For information on configuring the USB Server software, refer to the following FAQ: http://www.startech.com/faq/ipusb2vga_ipusb2hd2_usb_server_software
How do I install my video extender in Windows XP? (.exe method)
Before you install the device, make sure that your operating system is current (for example, the most recent service pack is installed). Download the latest drivers from the StarTech.com website at http://www.startech.com/Support . The part number and product ID are on the product packaging. Note : Windows usually saves the files to the Downloads folder that is associated with your user account (for example, C:Documents and Settings your_name My DocumentsDownloads). After the download is complete, right-click the zip folder that you downloaded, click Extract All , and complete the instructions. In the list of extracted files, double-click the Driver-Setup file. Complete the instructions to install the device drivers. When prompted to, restart your computer. To install the USB Server, complete the following: In the list of extracted files, open the Windows folder. Navigate to the App folder. Double-click the USBServer_Setup file. Complete the instructions to install the USB Server. When prompted to, restart your computer. For information on configuring the USB Server software, refer to the following FAQ: http://www.startech.com/faq/ipusb2vga_ipusb2hd2_usb_server_software
How do I install and configure the USB Server software?
Prior to installing this device, ensure that your operating system is up to date (for example, you have installed the most recent service pack). To install the USB Server software: Download the latest software package from the StarTech.com website (http://www.startech.com/Support). You can find the part number and product ID on the product’s packaging. Note: Windows will typically save the files to the Downloads folder that is associated with your user account (for example, C:Usersyour_nameDownloads). Once the download is complete, right-click the zip folder that you downloaded, select Extract All , and follow the on-screen instructions. Select the appropriate folder for your operating system. Right-click Setup.exe . Click Run as Administrator . Note: If the Run as Administrator option is not available, you might be attempting to run the installer from within the zipped file. Extract the files using the instructions in Step 2. Follow the on-screen prompts to install the software and restart the computer when prompted. Your computer will automatically complete the software installation and your device should be ready to use. Set up the software Confirm that the extender is on the same network as your computer. If you are using a network with DHCP, you do not need to configure anything further. If you are using an Ethernet cable to connect to the unit or you are using a network without DHCP, you need to change the IP address on your computer to the default IP network of the IP device server. Change the IP address of your system to 192.168.1.XXX , where XXX is a number between 1 and 49. Note: The default IP address of the extender is 192.168.1.50 on the default subnet mask of 255.255.255.0. USB Server software Your extender is detected by the USB Server software when the software is launched. Note: It may take a few minutes for the server to appear in the software. When the extender appears in the list (for example, USB2HDMI), click either the display or media device associated with the server. Click on one of the devices and then click Connect Device . When the USB Server software configuration is complete, the display and media devices are connected to your system as though the devices are installed locally. By default, Windows creates an extended desktop for the display, which you can reconfigure in the control panel.
Why can't I playback Netflix or other HDCP content with my USB video adapter?
Playback of HDCP content is not supported. Content from Netflix, Amazon Prime Video, Disney+, iTunes, Hulu, etc. may not work on USB-connected displays. We recommend using these apps on displays connected to your video card or motherboard. If using a laptop, use the integrated display, or the video ports built-in to the laptop.
Some graphics are not rendered correctly on the USB connected display when using Microsoft Office applications or web browsers. How do I fix this?
If hardware acceleration is enabled on any of your software applications, it can result in poor resource management and limit the performance of your video device. If you experience this problem, you should disable hardware acceleration in the program(s) that were impacted. To disable hardware acceleration in common applications and operating systems, complete one of the following series of steps, depending on what software application(s) or operating system that you are running. Chromium-Based Microsoft Edge: Click the Options icon (it has three dots on it). Click Settings . Click System . Uncheck Use hardware acceleration when available . Internet Explorer 9 and later Note: Earlier versions of Internet Explorer do not use hardware acceleration. Click the Start button. Open Control Panel . Click Network and Internet . Click Internet Options . Click the Advanced tab. Browse to the Accelerated graphics screen. Select the Use software rendering instead of GPU rendering check box. Click Apply . Restart your computer. Mozilla Firefox Open Firefox. Press the Alt key. Click Tools and Options . Click the Advanced icon. Click the General tab. Under Browsing , clear the Use hardware acceleration when available check box. Click the OK button. Restart your web browser. Google Chrome Open Google Chrome. Click the Options icon (it has three horizontal lines on it). Click Settings . Click Show advanced settings . Scroll to the bottom of the screen and clear the Use hardware acceleration when available check box. Restart your web browser. Microsoft Office 2013 / 2010 Open any program in Microsoft Office (for example, Microsoft Word). Click the File tab. In the menu on the left side of the screen, click Options . Click Advanced . Under Display , select the Disable hardware graphics acceleration check box. Close and restart all of the Microsoft Office programs that you had open. Windows 10 / 8 Press the Windows key + X . Click Control Panel . Click Personalization . Select a high-contrast theme. Windows 7 / Vista Click the Start button. Click Control Panel . Click Personalization . Select a non-Aero theme. Ideally, you should select a basic and high-contrast theme. Windows XP Click the Start button. Open the Control Panel . Select Display . Click the Settings tab. Click Advanced . Click the Troubleshooting tab. Move the Hardware Acceleration slider to None . Restart your computer.
Everything is hooked up but nothing is working. What should I do?
When you troubleshoot issues with a video extender, there are some quick tests that you can complete to rule out potential problems. You can test to make sure that the following components are working correctly and are not the source of the issue: Video and Ethernet cables Video extender Video source (such as a DVD player or computer) Video destination (such as a monitor or projector) Note: When you are testing setup components, you should avoid using video adapters. For example, if you are converting a VGA source to HDMI for use with an HDMI extender, you should use an HDMI source when you test the components. To test your setup components, try the following: Use the cable, video extender, video source, and video destination in another setup to see if the problem is with the components or the setup. Use a different cable, video extender, video source, and video destination in your setup to see if the problem persists. Ideally, you should test a component that you know works in another setup. When you test your cables, it is recommended that you do the following: Test each cable individually. Use short cables when you are testing. When you test the video source and video destination, it is recommended that you do the following: Remove the video extender from your setup and test to make sure that the video source and video destination work together without the video extender. Test to make sure that the video source and video destination work together at the resolution that you want to use. Note: In order for your setup to work properly, the video source, extender, and destination all need to support the resolution that you are using.
I cannot detect the device in the USB server software. What do I do?
If the device is not detected in the USB Server software, complete the following: Make sure that the computer is on the same network as the device. By default, the device uses DHCP. On a network that is plug-and-play, the device is assigned an IP address by the DHCP server and is detected by a computer that is on the same network as the device. To troubleshoot the device, connect it directly to a computer on the 192.168.1 network. For more information about configuring the USB Server software, refer to the following FAQ: http://www.startech.com/faq/ipusb2vga_ipusb2hd2_usb_server_software . If the network configuration of the device was changed, you cannot complete a hardware reset to put the unit back on 192.168.1.50. Instead, you need to obtain the static IP address from the person who modified the server. Wait 5 minutes for the USB Server software to detect the device. Move the device to a less congested network.
Why is my extended display black?
There may be several reasons that the display on the IP video extender is black. To determine the cause of the issue, try the following: Make sure that the USB Server software was installed and configured properly, and that the displays are detected. For more information about configuring the USB Server software, refer to the following FAQ: http://www.startech.com/faq/ipusb2vga_ipusb2hd2_usb_server_software . Make sure that the USB Server software detects the IP video extender. For more information about troubleshooting issues with the USB Server software, refer to the following FAQ: http://www.startech.com/faq/ipusb2vga_ipusb2hd2_loss_of_network_connection. . Confirm that the network equipment that you are using is capable of gigabit speeds. In the control panel on your computer, make sure that a compatible resolution is being sent to the monitor. Make sure that the display is set to the correct input. Some displays have multiple inputs that you can switch between. Make sure that the background is not black.
When should I use a longer video cable instead of a video extender?
Use a longer video cable whenever possible; use a video extender only when the required distance exceeds the reliable limits of standard or active cables. Explanation: Direct cabling is the preferred method for video connections because it maintains signal integrity and reduces complexity. Standard maximum cable lengths for common video signals are: Video standard Maximum length DisplayPort 50 ft. (15.2m) HDMI 50 ft. (15.2m) DVI 50 ft. (15.2m) VGA 200 ft. (71m) Active cables can extend these distances by incorporating built-in signal amplification and are designed to exceed standard length limits while maintaining specified performance. Video extenders are used when cable length requirements exceed what passive or active cables can reliably support. Extenders transmit the signal over longer distances by boosting and then restoring it, while maintaining the same video standard from input to output.
What is a video extender, and how can I tell if it will work in my setup?
A video extender (such as an HDMI extender or DisplayPort extender) transmits audio and video signals over longer distances than standard cables, and compatibility depends on signal type, bandwidth, resolution, distance, and cabling. Explanation: A video extender is a transmitter and receiver system that extends a video signal beyond standard cable limits by sending it over media such as Cat5e/Cat6 Ethernet, fiber optic cable, or wireless. Common types include HDMI extenders and DisplayPort extenders, often used for long-distance AV distribution. To determine if a video extender will work in a specific setup, verify the following: Signal compatibility: The extender must support the same video standard as the source and display (e.g., HDMI, DisplayPort) Resolution and bandwidth: Confirm support for required resolutions and bandwidth (e.g., 1080p, 4K, refresh rate, color depth) Distance and cable type: Ensure the extender supports the required distance over the intended medium (e.g., Cat6, fiber) Infrastructure type: Some extenders require direct point-to-point connections, while others (IP-based extenders) support network switches Latency requirements: Check latency specifications for real-time applications (e.g., gaming, AV control) Feature support: Verify support for audio, USB, IR control, HDCP, and EDID if needed Power requirements: Confirm power is available for transmitter and receiver units If the video extender does not match the signal type, bandwidth, or infrastructure, it may result in no signal, reduced resolution, increased latency, or unstable performance.
What DC barrel connector power plug types do StarTech.com products use, and what are their dimensions?
StarTech.com DC barrel connector plug types are defined in the “Plug Type” field of the technical specifications, using a letter code that specifies the connector’s outer diameter (OD) and inner diameter (ID) in millimeters for power adapter compatibility. Explanation: In StarTech.com technical specifications, the “Plug Type” field is a standardized identifier for the exact DC barrel connector size required to power a product. Each plug type is assigned a letter code that corresponds to a specific combination of outer diameter (OD) and inner diameter (ID), measured in millimeters. Common DC barrel plug type dimensions Plug Type OD ID A 2.35 mm 0.7 mm B 4.0 mm 1.7 mm C 4.75 mm 1.7 mm H 3.4 mm 1.3 mm L 5.0 mm 2.5 mm M 5.5 mm 2.1 mm N 5.5 mm 2.5 mm The DC barrel connector plug type must match both the outer diameter and inner diameter exactly. A mismatch between the StarTech.com product requirement and the power adapter connector can prevent proper fit or stable power delivery, which may result in device startup failure or intermittent operation. The plug type defines only the physical connector size. The plug type does not define electrical power requirements such as voltage, current, or polarity. The power adapter used with a StarTech.com product must match the product’s specified electrical requirements. Using an incompatible power adapter can cause device malfunction or permanent damage. This standardized DC barrel connector plug type system enables IT professionals and procurement teams to verify connector dimensions, ensure power adapter compatibility, standardize hardware deployments, and identify the correct replacement power supply for StarTech.com products.
Related products
-

4 Port VGA Over CAT5 Video Extender - 450ft (150m) - TAA
$162.96 Add to cart -
4 Port VGA and Audio over Cat 5 Video Extender
$243.99 Add to cart -
8 Port VGA over Cat5 Digital Signage Broadcaster with RS232 & Audio
$402.99 Add to cart -

8 Port VGA Video Extender over Cat 5 (UTPE Series)
$312.99 Add to cart